
It should come as no surprise, but I’ve been sinking a lot of time into Wildfrost over the past few weeks. It’s an extremely fun card game, but it’s also extremely punishing. So much so, that for my first several attempts I thought winning would be unobtainable. However, I eventually got over that initial difficulty hump, and now I’m here to share some things I wish I’d known weeks ago when I started.
1. Grab At Least 2 Snow Cards
Snow is easily the strongest status effect in Wildfrost. It completely incapacitates a minion, freezes its turn timer, and nullifies both Trigger, and Smackback effects. This kind of crowd-control is so powerful that numerous enemies have the ability to reduce the effects of Snow. You know something is busted when the developers had to give partial immunity to key enemies, otherwise players could completely bulldoze through Wildfrost.


Given the sheer power of Snow, I recommend carrying at least 2 cards that can apply Snow in a run. All of the starting decks contain at least 1 Snow card, but having 2 or more provides a lot of extra utility. Specifically, Snow will let you lock down certain enemies so you can eliminate them before they attack, or space out enemy attacks across multiple turns. Either way, Snow gives the player a ton of control over the enemy’s attacking cadence, so having a few cards that can apply this effect in your deck is imperative to scoring a win.
It also bears mentioning that Snow completely shuts down mini-bosses like Maw Jaw, and the first form of Clunker. It’s night, and day how much easier both of these encounters are when you’ve got easy access to Snow cards.
2. Think About Moving Your Minions Every Turn
I wrote about this earlier in the month, but moving your units every turn is the key to winning in Wildfrost. I realize this will probably feel counterintuitive to a lot of players because it did to me at first. Normally moving your units around would count as an action, but in Wildfrost it doesn’t. This means that you can mix, and match how your army is oriented as much as you’d like during your turn, which gives you a lot of control over who takes damage.

While I can’t cover ever possible reason that you’d want to shift around your minions here’s 2 scenarios to give you pause for thought:
If you have a unit that builds up an effect everytime they take damage like Biji then perhaps it would make sense to intentionally let her soak a few light hits to power up before her next attack.
Alternatively, if you’ve lined up a kill for Big Berry then it would behoove you to pair him with some allies that need healing, as he heals everyone in his row after scoring a kill.


Small considerations like this across the whole of combat will ultimately make, or break your run, so always consider the position of your minions before you end your turn.
3. Healing Cards Are Very Strong
Moving your minions around the game board freely every turn isn’t the only unique mechanic of Wildfrost: you can also discard your minions from the field. This heals them, usually back to full health, which can be a useful way to top someone off mid-combat.
Unfortunately, discarding a minion means the player will need to shuffle them back into their deck, draw them, and then spend a turn playing them back to the field. This can be the right move, but what if your minions never had to leave the field in the first place to heal?

That’s where a number of Wildfrost’s best utility spells, and some minions with healing effects, come into play. There are a number of cards which can heal your minions, or increase their health. This provides them with an incredible amount of sustain, and will allow them to repeatedly soak hits.
Healing is even more powerful when combined with minions who increase their effectiveness whenever they’re attacked. I was going to list a couple of examples, but I thought better of it upon looking at the lexicon of minions in Wildfrost. Instead, you can read the card effects yourself:
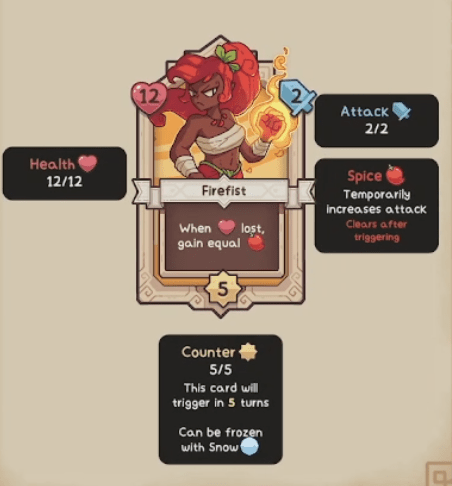
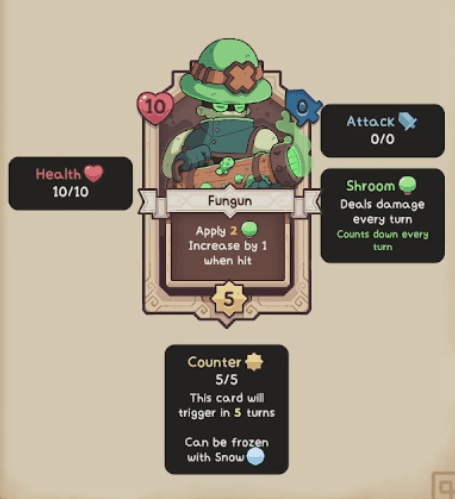


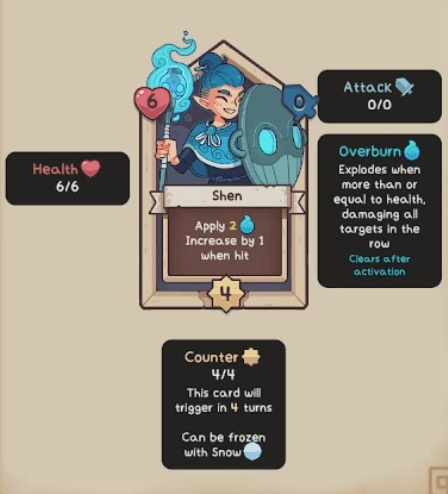
Normally, I’m an advocate for all out offense, but it’s hard to argue with how good healing is when it synergizes so well with so many cards. Heck, even in decks without cards that benefit from being hit repeatedly, healing is still strong. Alongside Snow, healing might just be one of the most powerful tools that the player can use throughout their run.
4. Keep Your Deck Thin
This is pretty useful advice across basically every single deck-building game. The more cards you have in your deck, the harder it is to draw the important ones. Having fewer cards means you’ll draw the cards you need when you need them, which will ultimately increase the consistency of your strategy.
There are 3 different ways to keep your deck thin in Wildfrost.
Skip Drafting Cards
I think this is pretty self explanatory, but your deck can’t become overcrowded if you don’t stuff it full of cards. You can always choose to skip drafting new cards into your deck, so if none of the available drafts look like they’ll be useful then you can simply say no to all of them.
Visit the Muncher
The Muncher is an event tile that players can find across their run. This brute will eat 2 of the cards from your deck, which can be a useful way to eliminate cards that you don’t need. Typically, I’ll try to visit the Muncher at least once to thin out some of the cards from the starter deck that I haven’t built my strategy around. I’d highly recommend newer players do the same, as this helps to remove a lot of inconsistency from your deck by the mid to late game.

Equip Charms with Consume Secondary Effects
This might be a weird one, but there are a couple different charms in Wildfrost that add the Consume effect to a card. This permanently removes the card from play for the remainder of combat once you play it. All of the charms in question greatly increase the power of said card, so you get to use a super powerful version of it once instead of repeatedly using a weaker version. This has the effect of causing your deck to thin out over the course of battle, which has a similar effect to liberally using the Muncher throughout your run, albeit with far more powerful, game-altering cards popping off.
5. Obtain and Use Crowns
If you want to win at Wildfrost you better get cozy with Crowns. These are a purchasable item at the store event tile, which you can equip to any card so that you’re able to play it before combat begins alongside your leader. This removes a ton of random chance as you won’t need to draw the card before playing it – you can simply play it on the field immediately. That’s hugely beneficial, and often makes or breaks strategies in Wildfrost.

It’s worth noting that Crowns cost an enormous 75 gold plus an additional 10 gold for every subsequent Crown you purchase. You can also take one as a reward for defeating the first boss, which can be an excellent way to obtain a Crown if you’re strapped for cash. How many Crowns you’ll need will differ from run to run, but it’s almost always worth investing in 1, or 2 to help set up the field with your win condition.
6. Combo Kill Enemies for More Gold
Speaking of gold: you need to defeat enemies as part of a combo to earn additional gold. A combo happens anytime you eliminate 2, or more foes in a single turn. Each time you increase the combo counter, you earn an additional gold bonus on top of whatever you’d normally receive. This bonus gives an additional 5 for each subsequent kill in the combo, so a well executed combo can potentially double your payout. This gives your way more buying power whenever you visit a shop, so it’s worth learning how to look for opportunities to combo whenever possible.

7. Frenzy is (still) Busted
When I originally wrote this article, Frenzy was far and away the best possible effect that you could have on a minion. Frenzy lets your minion attack once for every stack of it, which is just so strong. On offensively focused minions this effectively doubles their damage output, while also doubling the effects of any attack boosting buffs they receive. This can see them absolutely tear through the enemy, while also increasing your ability to perform combo kills. This, in turn, means you’ll have more money which means you can buy more Charms, or Crowns to further increase the strength of your deck.

It’s not just all out offense where Frenzy is good though: it also works on status dealing, and support oriented minions. Being able to apply a debuff twice in a single attack is really powerful. In fact, it’s so powerful that I’ve built entire decks around using Frenzy to apply a ton of debuffs, while some mid-ground attackers cleaned up the enemy board.
It can not be understated just how strong Frenzy is, and it is often an auto-win button whenever you can draft it into your run.
8. Teeth is Busted Too
Teeth isn’t quite as powerful as Frenzy, but I still have a soft spot for it. Partly because when I originally wrote this article, Teeth, Wildfrost’s version of thorns, was the easiest mechanic to build around. It’s super consistent because all you needed to do was recruit Taiga, and draft a single healing, or health increasing card. Given the much smaller card pool back in v1.0.5, this was all very easy to do, which meant I wracked up a ton of wins by simply letting Taiga do her thing with minimal support.

However, there have been several major patches since then which included a lot of balance changes. And Teeth is still just as strong as it always was. In fact, Taiga was buffed to have a shorter turn timer, so I’d argue it’s even better now.
That said, the increased card pool does mean that getting Taiga in a run is a lot less likely now. However, I still think Teeth, and by extension Taiga, make for a very beginner friendly build that’s easy to pilot to victory.
9. Build Around Multiple Win Conditions
Bonus Tip: generally speaking, I think it’s advisable to build around 2 different win conditions. Obviously one will be your primary focus, but having a fallback plan can prove to be effective in a couple different scenarios.
The first of those aforementioned scenarios is when you run across an encounter that hard-counters your chosen primary win-con. For example, if you’re running Frenzy, but get the encounter where every enemy has Teeth then you’re probably not in for a good time. You’ll incur so much passive damage every time you attack that your primary damage dealer will likely kill them self before you can make it past the second wave of enemies.

The other scenario is for times when something just happens to go wrong. I still make mistakes, and accidentally get my primary win-con killed in some of my runs. It happens. Having another strategy in your back pocket that you can easily pivot into prevents this from being a disaster scenario though. This is why I’d recommend splitting your eggs across 2 baskets instead of going all in on a single mechanic.
With that, I think I’m done. Wildfrost is a game that will, at times, test your patience, but once you get your head around it then you’ll start scoring wins fairly consistently. Each of the lessons I shared above helped to increase my own ability to succeed at the game, and I hope they’ll help you too.
Did you enjoy what you read? Consider supporting my work by buying me a coffee over on Ko-fi.
