It’s been a little over a year and I still see people asking about how to best Alatreon in Monster Hunter World. With the game being in maintenance mode there is no guarantee that players will be able to find a group to help with taking down this creature and as such I thought there might finally be a reason for me to share how I beat Alatreon solo. My hope is that the following body of text can also help to guide players to a solo win.
Enough with the preamble. Let’s begin.
Table of Contents
Assumptions
While writing this guide I’ve made a handful of assumptions. I’d like to state them so that we’re all on the same page.
- You don’t have access to Kulve Taroth weapons or armor
- You don’t have access to Safi’Jiva weapons or armor
- You have already finished the prerequisite Furious Rajang and Raging Brachydios fights
- You are at least MR 200
- You don’t have access to Alatreon weapons or armor (yet)
- You don’t have access to Fatalis weapons or armor
If I’m writing a guide for soloing Alatreon I’m not going to hit you with needing to do a group quest to get the necessary weapons and armor. All of the builds I’ll share are obtainable solo. It should go without saying, but if you do have access to any of the above you’ll be able to craft a more optimized build than what I share in this guide. The purpose of this guide is to provide a resource to folks who are currently stuck on Alatreon so they can complete the fight with resources that don’t require other players to obtain.
Alatreon

Alatreon’s main gimmick is that it has control over all of the elements. Because of this it can use all sorts of different elemental attacks. The main downside to this is that Alatreon can reasonably hit hunters with five different debuffs, all of which suck for different reasons. In addition, it has a boat load of health so emerging victorious from the fight is no easy feat.
Eschaton Judgement
As I’m sure most of you are already aware, Alatreon has a super move that will one shot hunters. Unfortunately, dealing with this move is a little more complicated than simply hiding behind some rocks.
There is no way to outright avoid Eschaton Judgement. Instead, Hunters have to reduce the damage of it by inflicting a set threshold of elemental damage to Alatreon. If they successfully meet the threshold then they can survive the attack, otherwise they’ll be melted. Given you only have three carts to work with it is imperative that you successfully cancel Eschaton numerous times throughout the fight.
It’s no secret that certain weapon types do terrible elemental damage, but Capcom did account for this. I’ve included a graphic below curtesy of the Monster Hunter Reddit where a user broke down how elemental scaling was applied based on each weapon. What this means is that, in most cases, all weapons will have approximately the same capacity for hitting the appropriate elemental threshold to reduce Eschaton Judgement’s damage.
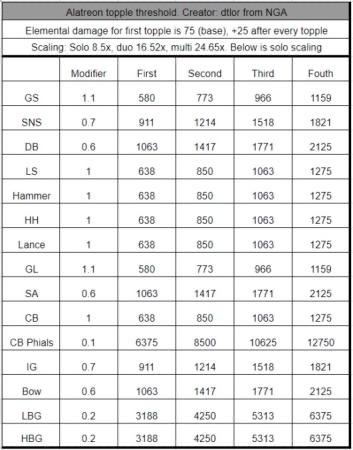
Alatreon uses Eschaton approximately once every six minutes. Assuming you successfully hit the elemental damage threshold three times, this gives you about eighteen minutes before the fight is on a timer (more on that later). Most of the builds I’ve included were able to finish the fight by the twenty four minute mark meaning they either finished just before, or just after Alatreon used its fourth Eschaton Judgement. This is around where you’ll want to aim as it gives you the flexibility to accidentally cart at least once throughout the hunt.
Fire and Ice Active Mode
Unfortunately, Alatreon can swap which elements it is weak to throughout the fight, which makes hitting the elemental threshold a little less straight forward. The creature will start out the fight in either Fire or Ice Active mode. You will know which of these modes it is in based on the event quest name as well as the description. The Evening Star event quest starts Alatreon in Fire Active mode, while Dawn of the Death Star starts Alatreon in Ice Active mode. The background of the arena you fight Alatreon in also shift colour based on which active mode it is in with orange and red tones being used for fire, while blue and white are used for ice.
It is also worth noting that if you’re doing the assignment to unlock Alatreon (Dawn’s Triumph) then you’ll always be starting against a Fire Active Alatreon.


As I’m sure many of you have guessed by now, while in Fire Active mode Alatreon is weakest to ice damage and the reverse is true in Ice active mode. With that in mind, if you’re attempting a quest where Alatreon starts in Fire active mode you’ll want to bring ice elemental damage. Conversely, if you’re attempting a quest where Alatreon starts in Ice active mode you’ll want to bring fire elemental damage instead.
Dragon Active Mode
Dragon Active mode is a transitionary mode that Alatreon will enter between Fire and Ice. In this mode it is a little weak to all elemental damage types. If you haven’t already hit the elemental damage threshold while Alatreon was in Fire or Ice active mode, this will be your last shot to prevent Eschaton from melting you.
Normally Alatreon will shift from Fire or Ice active mode into Dragon and then unleash Eschaton Judgement. After doing this it will swap to the opposite active mode. That means the general flow of the fight would look something like this:

I’m sure you can already see the problem here: if we bring ice element to counter fire Alatreon then we’ll be completely shutdown when it swaps to Ice Active mode after using Eschaton. This is where horn breaks come in.
Dragon Active mode is the only time that Alatreon’s horns can be broken. It has two horn breaks and whenever you break its horns it won’t swap to the opposite element after Eschaton. This means that you’ll have a flow chart that looks something like this:

This allows us to continue using our ice elemental build effectively throughout the hunt instead of having Alatreon hard counter us for a portion of the fight. As such it is extremely important that you get a horn break whenever Alatreon enters Dragon active mode. It’s also worth noting that you can only get two horn breaks per hunt so you will only be able to keep Alatreon locked out of the opposing element for a limited time.
Strategy for Dealing with Eschaton Judgement
Knowing what we do about how the Alatreon fight works here is a breakdown of the general strategy you’ll want to follow so you don’t get melted by Eschaton Judgement.
Step 1: Bring a set that deals ice elemental damage to counter Fire Active mode, or fire elemental damage to counter Ice Active mode
Step 2: Attack Alatreon’s forearms and hindlegs until you hit the elemental threshold. At this point the beast will topple over and the Handler will alert the player that they are, “doing a great job containing Alatreon’s power”.
Step 3: Once Alatreon enters Dragon active mode attack its head until you get a horn break (maximum of two).
Step 4: Face tank a weakened Eschaton Judgement.
Step 5: Repeat steps 2 through 4 until Alatreon dies.
How to Heal Through Eschaton Judgement
Fundamentally you have 2 different options for this. All of the sets in this guide will use the second option, but you can always use the first in a pinch.
Your first option is to use Astera Jerky when you’re at around half health and to then use a max potion. The jerky instantly recovers your lost health and gives you a buff for increased healing and the max potion will instantly recover your health again. You’ll need to use both of these recovery items as Eschaton still does over two hundred damage even after you’ve hit the elemental damage threshold that reduces its damage.
The alternative method, and the one which I’d have you use, involves using the Health Booster and Astera Jerky. While Alatreon is charging up the attack walk beside it and place the Health Booster down. After Eschaton Judgement is unleashed you’ll want to use Astera Jerky after you’ve lost half of your health. This will recover your health to full, while the Booster keeps you topped off for the remainder of the attack. If you’ve timed things correctly you should also be able to sharpen your weapon while the Booster keeps you alive through the end of Eschaton Judgement.


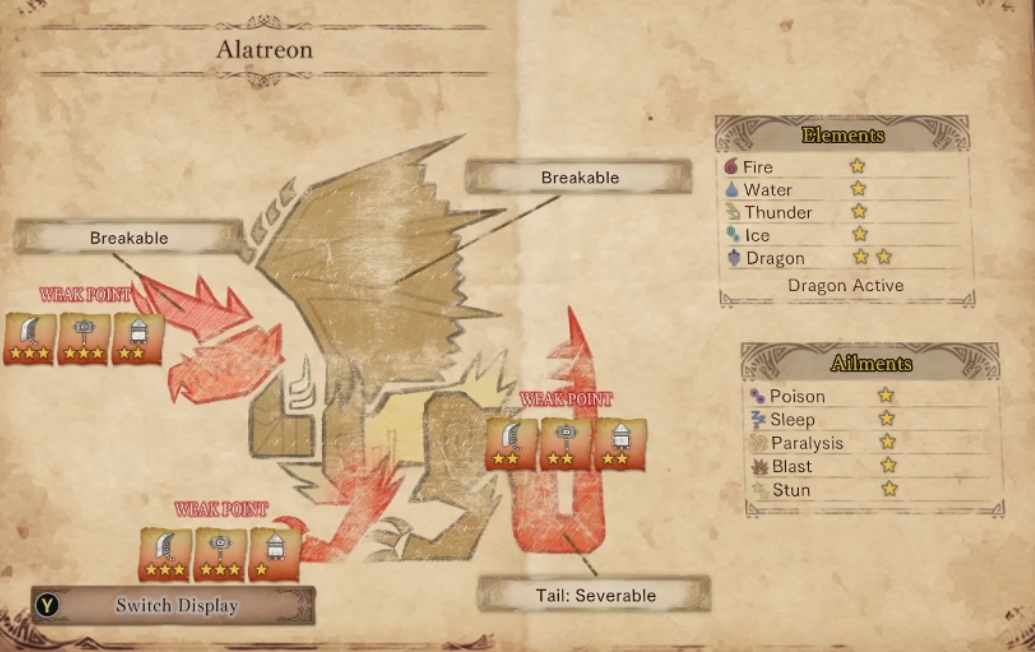
Why Should I Attack the Forearms and Hindlegs?
As previously discussed, we need to deal a set amount of elemental damage to Alatreon in order to prevent it from melting us. To do this with a high degree of success we’re going to need to target its limbs and discuss hitzone values.
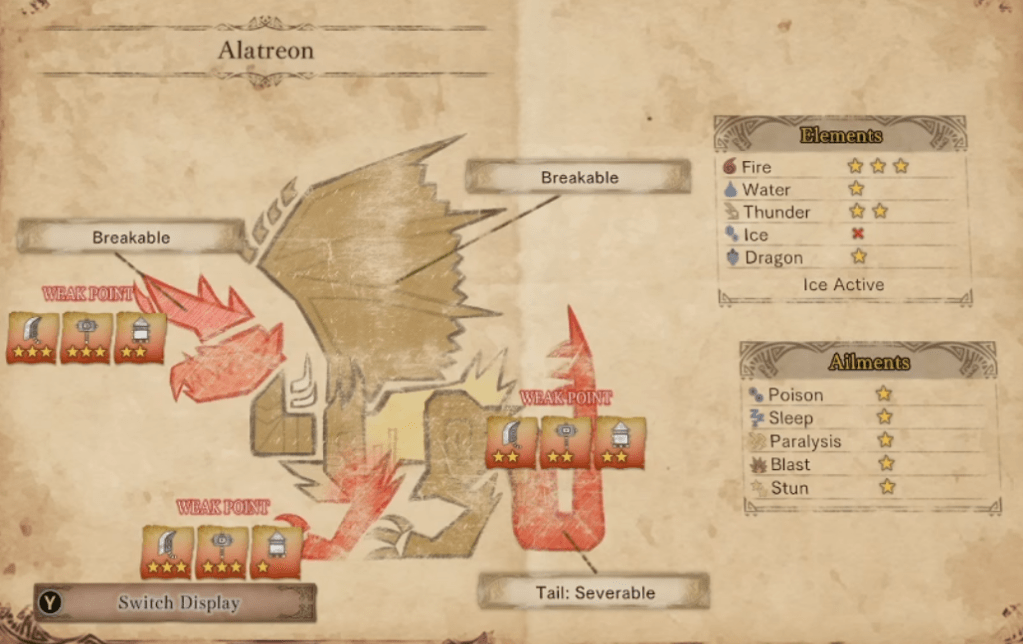
In Monster Hunter each body part on the monster is given a set of variables that determine how susceptible to different types of damage said part is. These are referred to as hitzone values. Thanks to Kiranico’s Monster Hunter database we can clearly see Alatreon’s different hitzone values and determine where we can do the most damage to it.
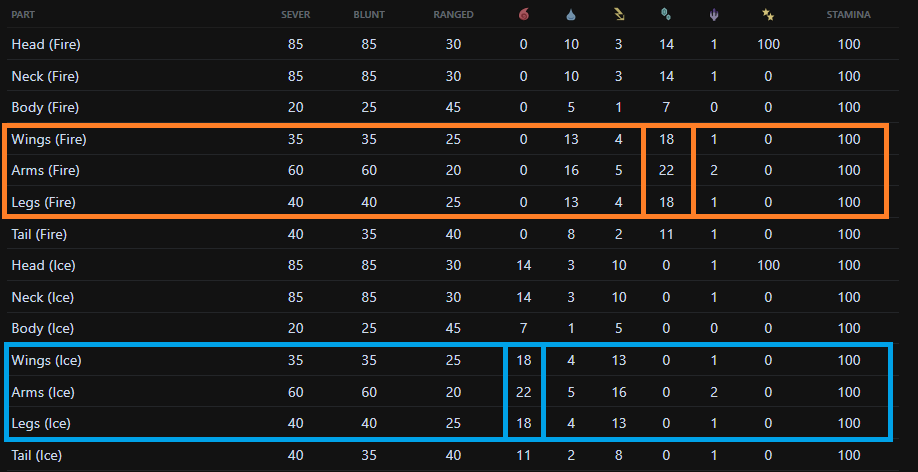
Unfortunately, the overwhelming majority of its hitzones take fairly mediocre elemental damage, which will make hitting the required damage threshold exceedingly difficult. The two places we can target for reliable damage are the forearms and hindlegs, which take 22 and 18 elemental damage respectively. As such these are the two areas we’re going to want to focus on while working towards our elemental topple.
It’s also worth noting that the wings have an 18 elemental damage hitzone so that is also a viable target for those weapons that can reliably hit them.
I also feel it is worth mentioning that you’ll want to tenderize any of the parts you’re attacking. This will ensure we maximize all sources of damage which will help in reaching the elemental threshold as well as killing the monster. In my experience if you don’t tenderize Alatreon there is no way you’ll be able to do enough damage to consistently meet the elemental threshold, nor will you defeat the monster before it inevitably wipes you out.
How do I Break the Horns?
The obvious answer here is to attack Alatreon’s head while it is in Dragon Active mode, but not every weapon can do that easily.
Hunters will want to keep Alatreon’s head tenderized and make use of the flinch shot mechanic. Speaking from experience if you flinch shot Alatreon into a wall, or out of the sky while its head is tenderized you will almost always get a horn break. If you don’t immediately get it you will when you beat down on the monster’s head while it wobbles around on the ground.


If Alatreon is enraged and the flinch shot isn’t available as an option then just try to make use of clutch claw combos to its face, or use weapon specific attacks that can easily target the head. The threshold for breaking the horns is actually fairly low, especially in solo play, so as long as you continue to keep Alatreon’s head tenderized you shouldn’t have a problems getting both of your horn breaks throughout the hunt.
Combat Tips
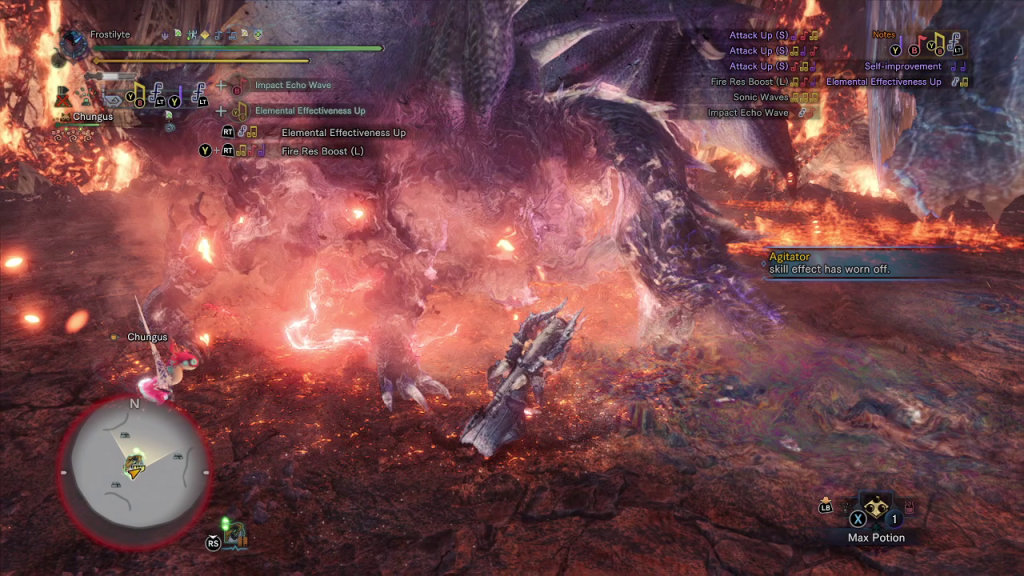
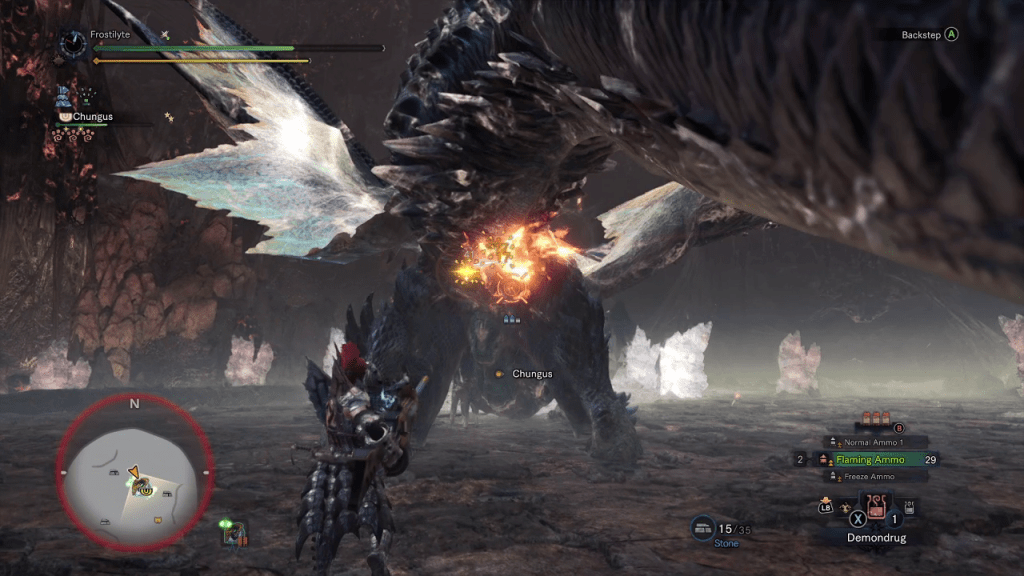
At the start of the fight Alatreon will roar when it sees you. Learn to time a dodge so you can roll through the roar and immediately clutch claw onto the creature’s head. If you preform two claw slaps you should then be able to flinch shot Alatreon into one of the three walls in the arena. This provides a great opportunity to tenderize the forearms while also enraging Alatreon. Note: there is a chance Alatreon will use a lightning attack to get you off of its head. We still want to enrage the monster as quickly as possible for the armor skill Agitator though, so look for an opening and flinch shot the creature even if this happens. Hitting the wall and successfully toppling Alatreon isn’t anywhere near as important as pissing it off is.

When you are knocked down by any of Alatreon’s move do not get up immediately. This monster almost always goes for combo attacks, but you’re invulnerable while grounded (unless you’ve been pinnned). Wait to see what it’s going to do and time your wake up so you can safely pivot around the attack.
Always use your staggers and topples to tenderize important parts of Alatreon if they aren’t already tenderized.
When Alatreon is flying you are usually safe to use clutch claw tenderizing attacks on its legs and arms.

When Alatreon uses the attack that sends lightning strikes out in a radius around it you can safely tenderize the hindlegs. This can also be a viable window for tenderizing the forearms depending on your weapon.
While Alatreon uses the lighting attack that fires off several waves of lightning strikes you can viably tenderize any part of it aside from the head.
After Alatreon uses the flame geyser attack, hunters can roll or walk into the centre following the first geyser pulse (pictured below). You can then attack or tenderize its head. Mastering this maneuver in particular is essential for beating Alatreon.
In my experience flinch shots are easier to do against Alatreon while it is flying. This also has the added benefit of bringing it out of the sky. I’d advise getting your tenderizing in before doing this so you can beat down on Alatreon once it is grounded.
Alatreon’s ice breath attack is so slow and has such a long active window that hunters can viably tenderize any part of it. This is also a great setup for flinch shots provided the monster is nearby one of the walls in the arena.

With 5 levels of Evade Window you can roll through almost all of Alatreon’s attacks. You’ll want to get in the habit of rolling into and through attacks as this allows you to maintain momentum and pivot quickly into counter attacks. Alatreon’s different fire breath attacks are a great example of a move that can be easily rolled through that provides a sizeable counter attacking window for hunters to strike back.
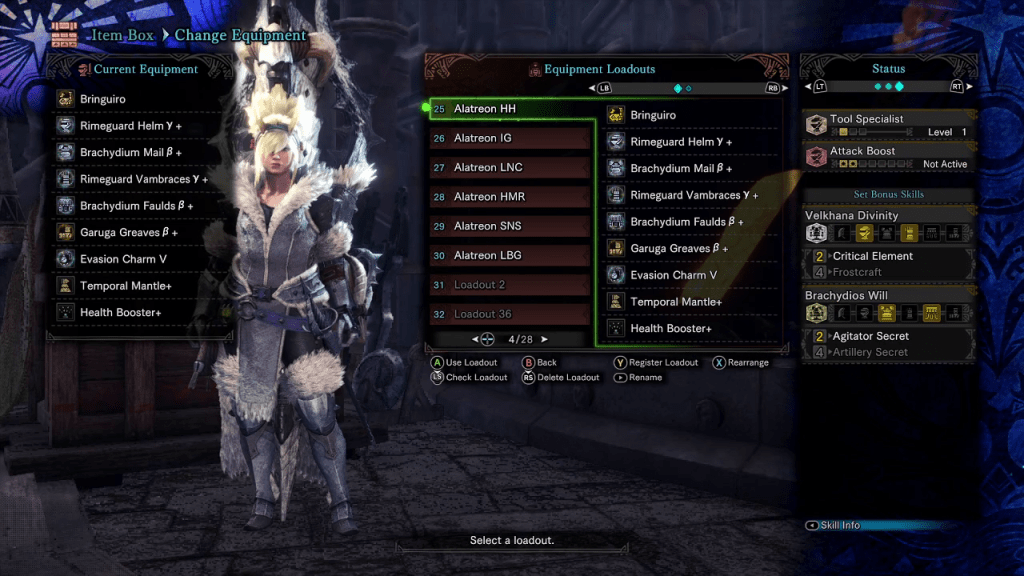
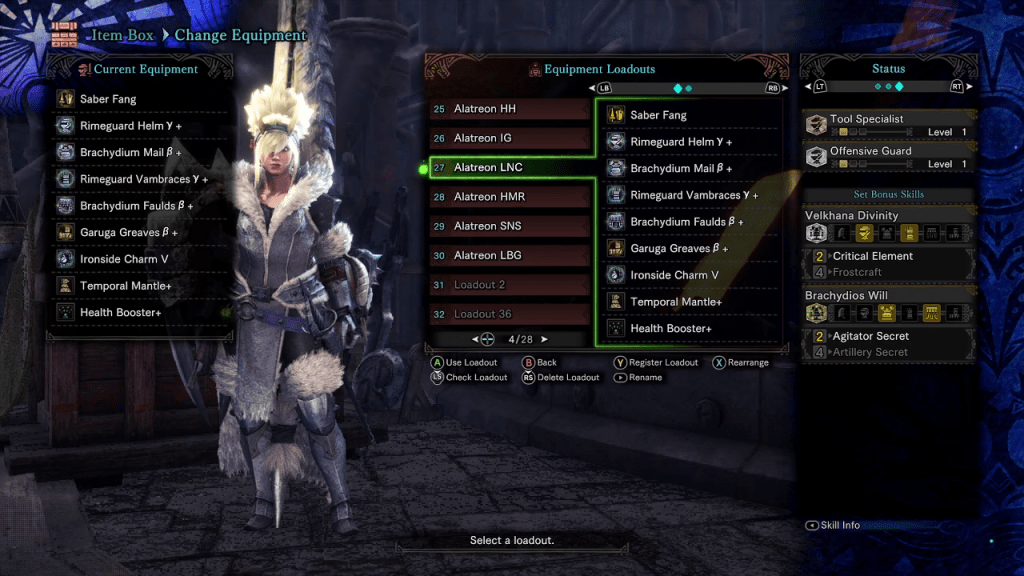
Anti-Alatreon Builds
I haven’t covered all of the weapons here as I’m not proficient enough to finish the fight with every single one. I realize that not everyone can play every weapon, but I hope what I’ve covered here can help get you started making your own build for your desired weapon. If there is a weapon you’d like me to cover that I haven’t already please leave a comment and I’ll look into it and update the guide.
I’ve also split this section so that it covers sets for both Fire and Ice active mode. The event quest for Alatreon alternates daily, so you should be able to get ample use out of both sections.
Fire Active Builds

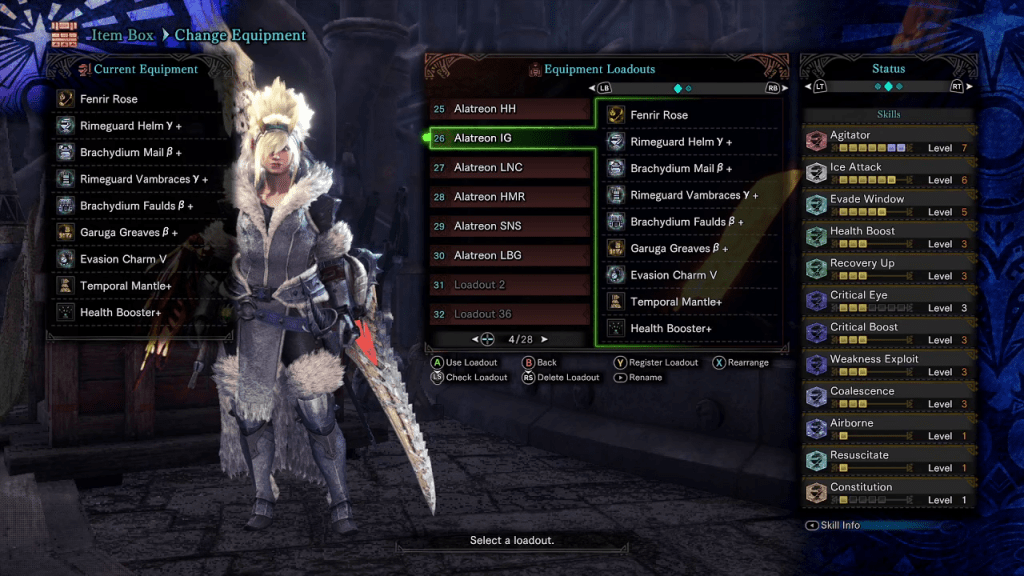
All of these builds make use of Weakness Exploit because Alatreon has fairly bad hitzone values across the board. As such we’re going to have to tenderize to hit our elemental damage thresholds, break Alatreon’s horns, and generally do enough damage to finish the fight in a timely manner. Since we’re tenderizing anyway we might as well use Weakness Exploit to get the most out of it.
Two pieces of Velkhana gamma armor have been slotted in for Critical Element which is going to allow all of our elemental attacks to take advantage of the 100% critical chance we have while attacking tenderized parts. This should allow us to reliably hit three elemental damage checks throughout the hunt.
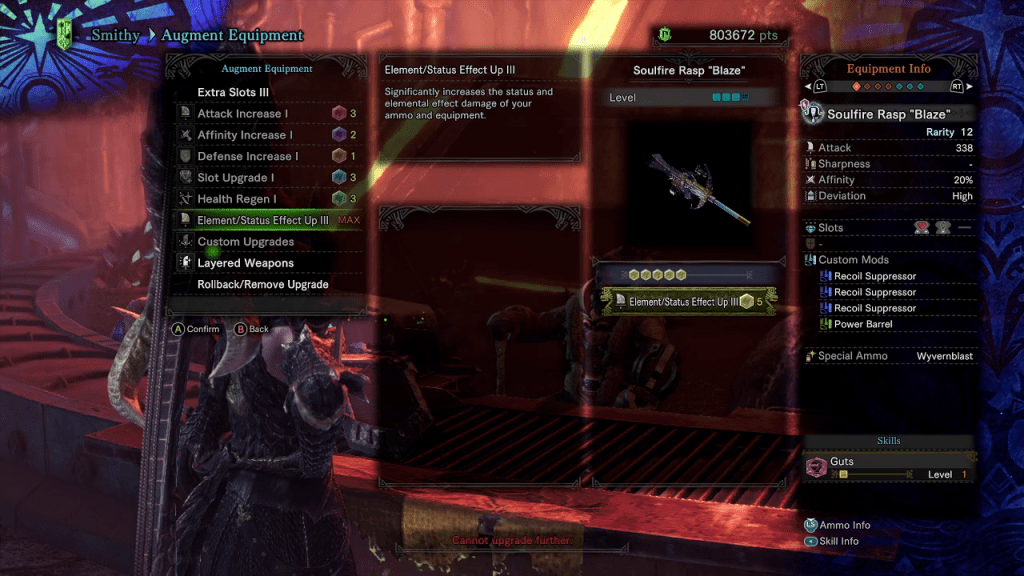
Finally we have Coalescence. This skill provides a massive elemental and raw damage boost that lasts for 90s after we recover from a status ailment. Alatreon having the ability to hit us with all five elemental blights means that we can get a lot of mileage out of this skill whenever we’re hit by an attack. My recommendation would be to leave blights active for as long as possible, or otherwise recover from them naturally if Coalescence is already active. This will allow you to maximize the buff’s uptime. The one exception to this is dragon blight as it negates elemental damage, so you’ll want to cure that immediately to continue doing elemental damage to Alatreon. Trust me – Coalescence is the MVP of this build.
Hunting Horn


There isn’t much deviation here from our standard set, but we have slotted in Horn Maestro. This skill is an obvious must as it will increase the duration of Attack Up from 90s to 120s, which will make it easier to maintain throughout the hunt. This also increases the duration of our Self Improvement and Elemental Up songs, again making them a little easier to maintain throughout the hunt.
I’ve already covered a lot of combat related tips in this guide, but for the Hunting Horn specifically do not try to tenderize the forearms during the lightning AoE attack. The Horn’s tenderizing attack animation will cause your hunter to clip into the blast zone of one of the lightning bolts, which is obviously something we’d rather avoid.
Additionally, you should spend most of your hunt building Attack Up songs and playing encores when the appropriate windows appear. The extra damage that accompanies having perfect uptime on this song really can not be understated. Also, remember you can cancel part of an encore’s recovery by rolling out of it after the buff activates.
Insect Glaive
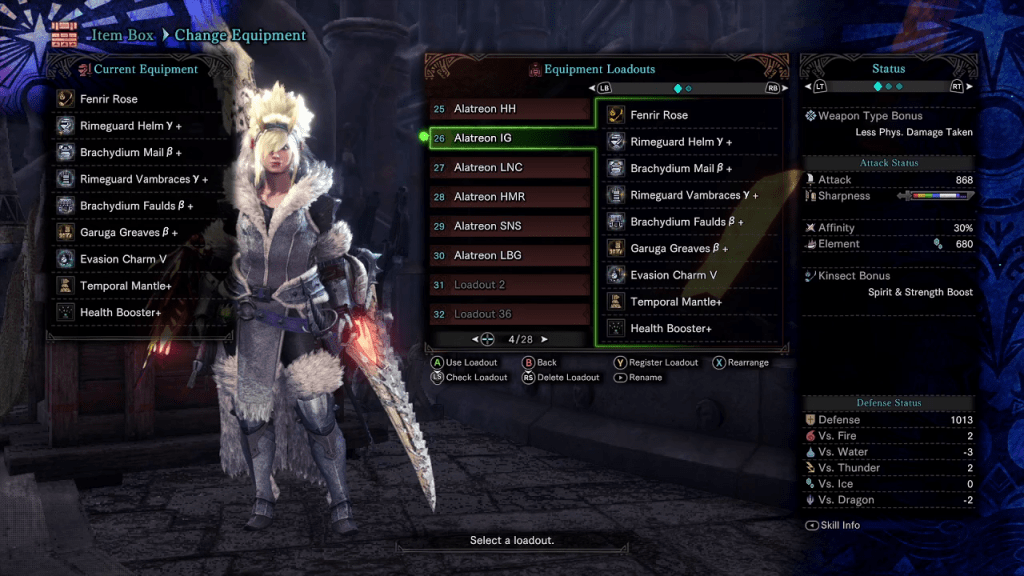
Before going into this hunt you’ll want to augment your Kinsect to deal ice damage. This in combination with the your weapon will ensure that the Insect Glaive can hit all of the elemental thresholds with relative ease. Once you’ve got your buffs let your Kinsect go to town on Alatreon and you should have no trouble consistently hitting the elemental threshold.
I’ve slotted in Airborne here because Alatreon’s wings have the same elemental hitzone values as its hindlegs, which means they’re a prime target for us to accumulate elemental damage. The wings are also criminally easy to tenderize and the Insect Glaive’s aerial attacks avoid just about all of Alatreon’s attacks. The only things you’ll want to watch out for are lightning attacks as those are telegraphed on the ground, which you might miss while you’re flying through the air.
I’ve opted for two elemental augments here, but honestly you could probably get away with only having one and using those slots on attack upgrades instead. Your Kinsect helps to lift a lot of the burden of hitting Alatreon’s elemental threshold off of your shoulders, so having the extra damage may be more beneficial.
Of all the builds I tested this was the most reliable. I wouldn’t consider myself an avid Insect Glaive player, but this build absolutely melted Alatreon in all of my testing runs despite my lack of experience with the weapon.
Lance

Given that the Lance is bulky and has the ability to block I’ve opted to swap out the Evade Window charm for a Guard charm. In all of my test runs I was able to block all of Alatreon’s attacks without needing Guard Up, so I’ve opted to not include that here and instead focus on a few more offensive skills. Also, because we’re relying on Guard I’m running a health augment to offset the chip damage we’ll be receiving throughout the fight.
While you can counter attack and counter claw with the Lance I would advise against it as some of Alatreon’s attacks have immediate follow ups that can damage you. It’s generally safer to time a perfect block for the damage boost from Offensive Guard and then pivot into a counter attack. You’ll also want to make use of the extended hop thrust for mobility to close gaps as several of Alatreon’s attacks will zone you out of your effective range after you block them.
This is another relatively safe build and is fairly easy to use once you master the Lance’s different mobility options and Alatreon’s attack timing.
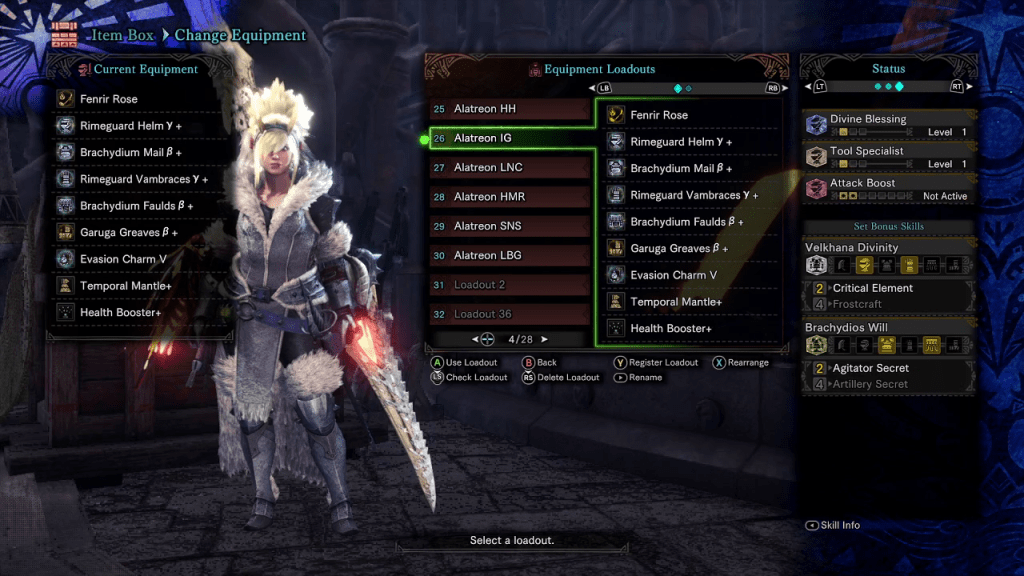
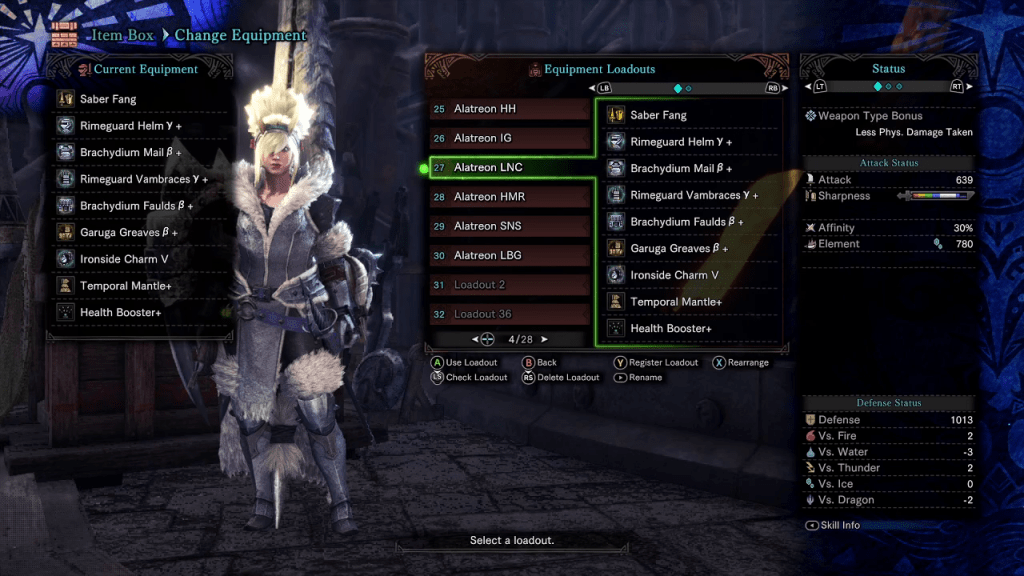
Palico and Equipment
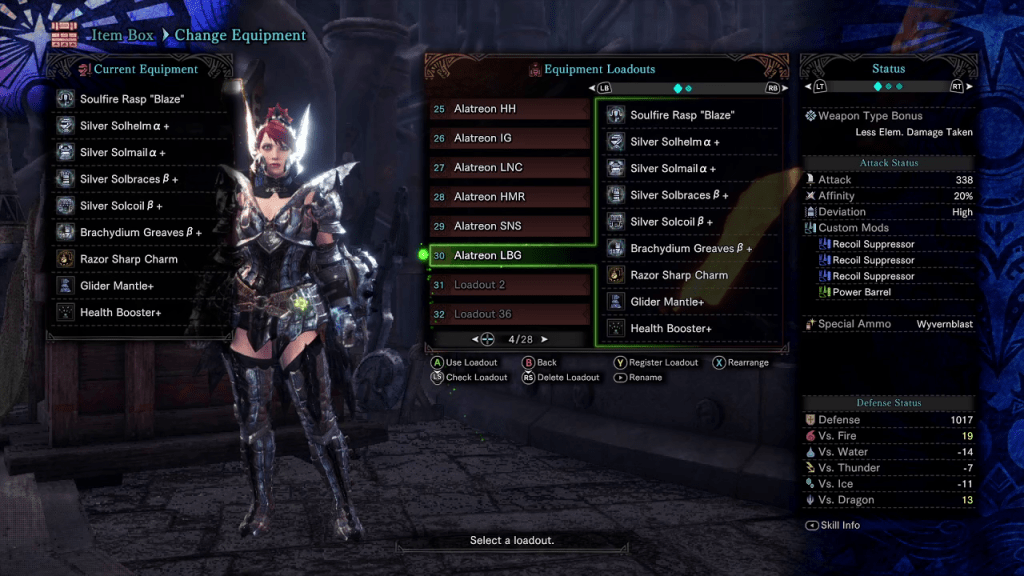
For our equipment loadout we’re going to use the Health Booster and Temporal mantle slotted with two attack decorations. For justification on why we’re using the Health Booster please see the explanation in Healing Through Eschaton Judgement. Personally I find this eases the reliance on our limited healing supplies, which I’m assuming hunters reading this guide will need to make full use of throughout the hunt.
The Temporal mantle should be self explanatory. It’s the single most busted piece of equipment in the game even after the Iceborne nerfs. It will negate us taking damage up to four times. This can help to save us from wombo combos, but the best utility of the mantle is using it to score flinch shots. If Alatreon attacks before you can slap it with the clutch claw you won’t be tossed off the monster, which makes scoring those important flinch shots a lot easier.
One thing to note is that if Alatreon uses a lighting based attack while you’re on its head you will waste this mantle. Its horns become electrified while it uses lightning elemental attacks and this will count as a multi-hit attack if you’ve clawed onto the head. This is relatively easy to avoid and something you’ll get a feel for avoiding with practice.

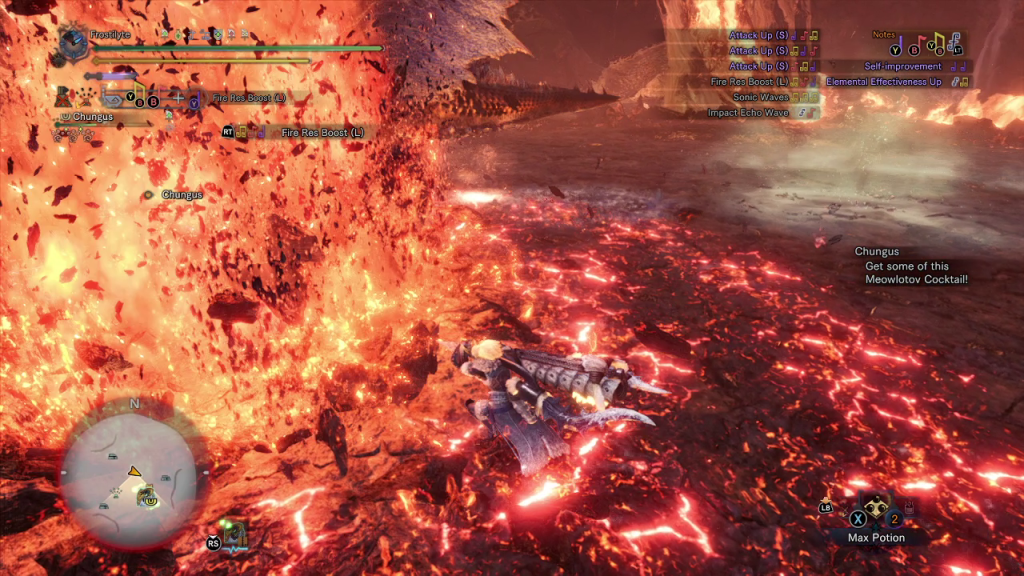
For our trusty Palico we’re bringing the Velkhana weapon and the Meowlotov Cocktail. Giving our Palico an ice weapon will help us to hit our elemental thresholds, doubly so when combined with Meowlotov. The Meowlotov takes on the elemental or status of the Palico’s weapon, so when our Palico uses the multi-hitting fire cracker attack this can potentially do a huge burst of elemental damage to Alatreon on our behalf.
Ice Active Builds

Similar to our Fire active builds we’re making use of Weakness Exploit in our Ice active builds The justification for it is the same: Alatreon’s hitzones aren’t the best and this will help us to maximize our elemental damage output while also topping off our total damage dealt to the creature so that we can kill it and finish the fight. If we’re tenderizing Alatreon already we might as well run Weakness Exploit to capitalize on the benefits we get from it.
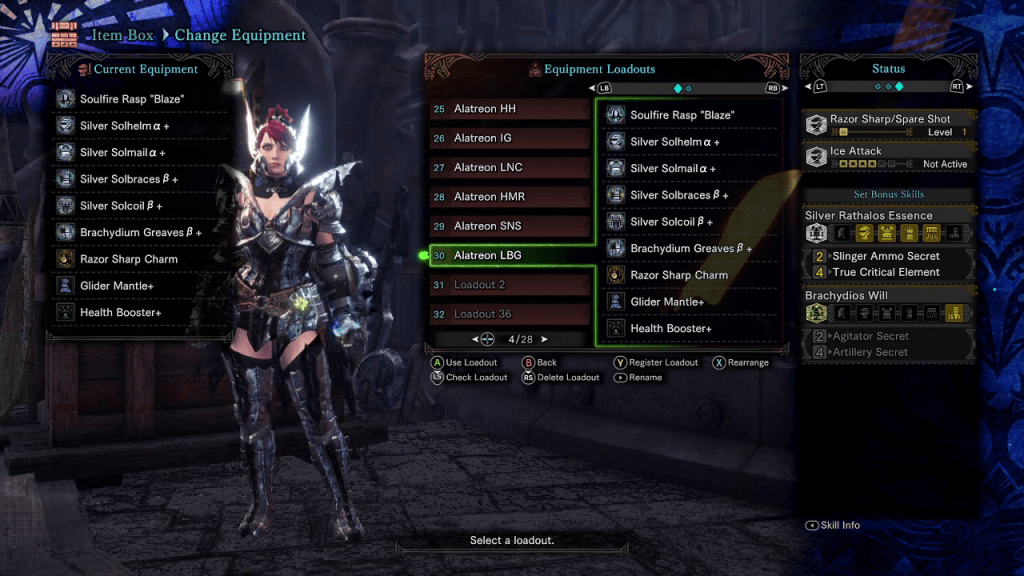
These sets all make use of Silver Rathalos armor which comes with built in Fire Attack and a four piece set bonus for True Critical Element. This not only allows our critical to affect our elemental damage, but it also applies a damage boost similar to three levels of Critical Boost. This means that we’ll be doing a LOT of elemental damage provided we effectively keep Alatreon enraged and tenderized.
We’re also still using Coalescence, though we only have room for one level of it. This skill provides a massive elemental and raw damage boost that lasts for 90s after we recover from a status ailment. Alatreon having the ability to hit us with all five elemental blights means that we can get a lot of mileage out of this skill whenever we’re hit by an attack. My recommendation would be to leave blights active for as long as possible, or otherwise recover from them naturally if Coalescence is already active. This will allow you to maximize the buff’s uptime. The one exception to this is dragon blight as it negates elemental damage, so you’ll want to cure that immediately to continue doing elemental damage to Alatreon.
Hammer

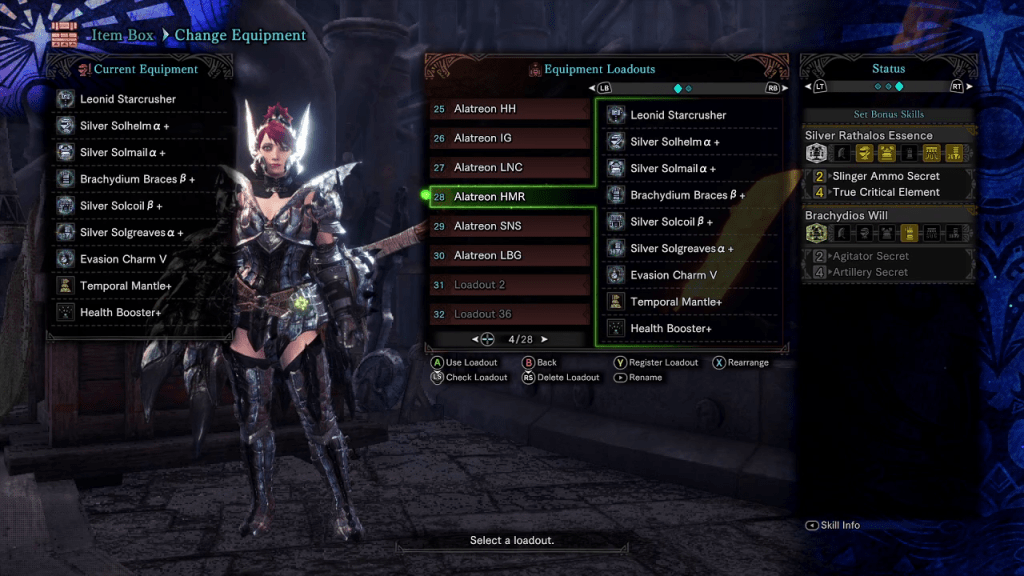
In order to hit 100% critical reliably I’ve opted for a critical augment on this Hammer build. In combination with the other skills this should give our Hammer a reasonable damage output provided we keep Alatreon tenderized. Of all the weapons mentioned in this guide, the Hammer will likely have the easiest time with tenderizing as its powerful charged attacks allow it to follow up with a tenderizing combo. Make liberal use of this throughout the fight for the best results.
You’ll also want to get comfortable with timing your uppercuts to hit Alatreon in the head. This is fairly easy to do once you’ve practiced it and will help with getting additional knock downs and both of your horn breaks. Alatreon’s horns aren’t especially hard to break, but the Hammer has a really easy time in this department given the motion values on its uppercut attack.
Sword and Shield

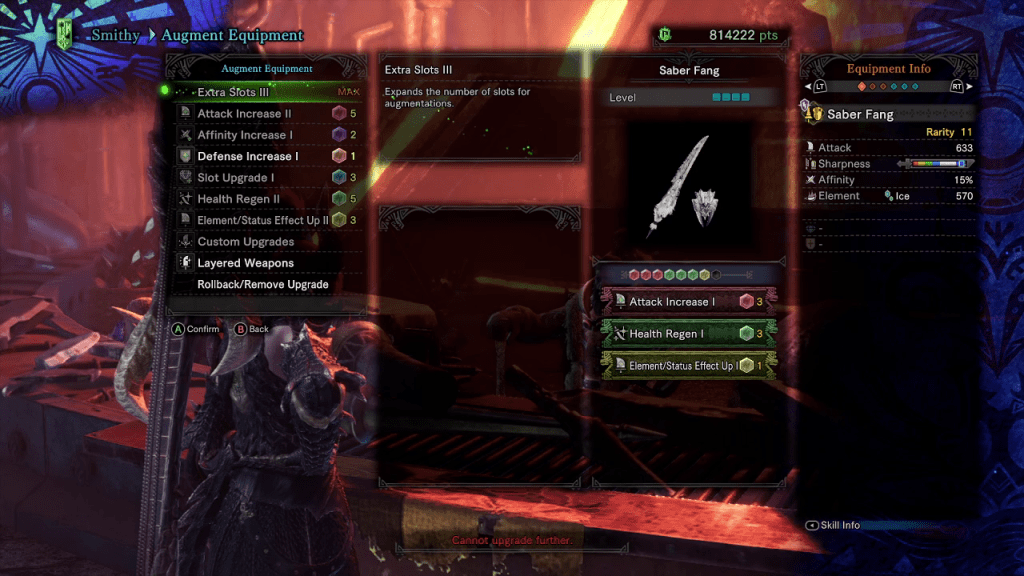
We’re running what I’d consider a fairly bog standard Fire elemental Sword and Shield set here. We’ve slotted in a critical augment to ensure that when we’re hitting tenderized parts we’ll always score a critical hit. This should allow us to deal a ton of damage throughout the fight and really maximize our elemental output.
There was a spare level one decoration slot and I didn’t have any better ideas for what to put there so I dumped in Fortify. You could realistically include this on any of the builds mentioned in this guide as you’ll receive a power boost if Alatreon manages to kill you. While you’re still learning to navigate the hunt this extra damage boost can be a huge boon, especially because Alatreon can absolutely melt hunters with the majority of its attacks.
Also, you should be comfortable doing the rolling claw combo that allows you to tenderize with a single tenderize combo. Light weapons having to do two tenderize combos can make tenderizing Alatreon in solo play fairly tedious and time consuming, so using the Sword and Shield’s special combo that bypasses this critical weakness should prove most effective.
You’ll also want to rely almost exclusively on the perfect rush combo for dealing damage. Slinger Capacity will provide extra ammo in your slinger, which can make using Slinger Burst -> Perfect Rush a viable attacking route throughout the fight. Alternatively, you can always use a Shield bash -> Back Step -> Perfect Rush if you don’t have any slinger ammo, or are otherwise more comfortable using this particular combo route.
Palico and Equipment
For our equipment loadout we’re going to use the Health Booster and Temporal mantle slotted with two attack decorations. For justification on why we’re using the Health Booster please see the explanation in Healing Through Eschaton Judgement. Personally I find this eases the reliance on our limited healing supplies, which I’m assuming hunters reading this guide will need to make full use of throughout the hunt.
The Temporal mantle should be self explanatory. It’s the single most busted piece of equipment in the game even after the Iceborne nerfs. It will negate us taking damage up to four times. This can help to save us from wombo combos, but the best utility of the mantle is using it to score flinch shots. If Alatreon attacks before you can slap it with the clutch claw you won’t be tossed off the monster, which makes scoring those important flinch shots a lot easier.
One thing to note is that if Alatreon uses a lighting based attack while you’re on its head you will waste this mantle. Its horns become electrified while it uses lightning elemental attacks and this will count as a multi-hit attack if you’ve clawed onto the head. This is relatively easy to avoid and something you’ll get a feel for avoiding with practice.
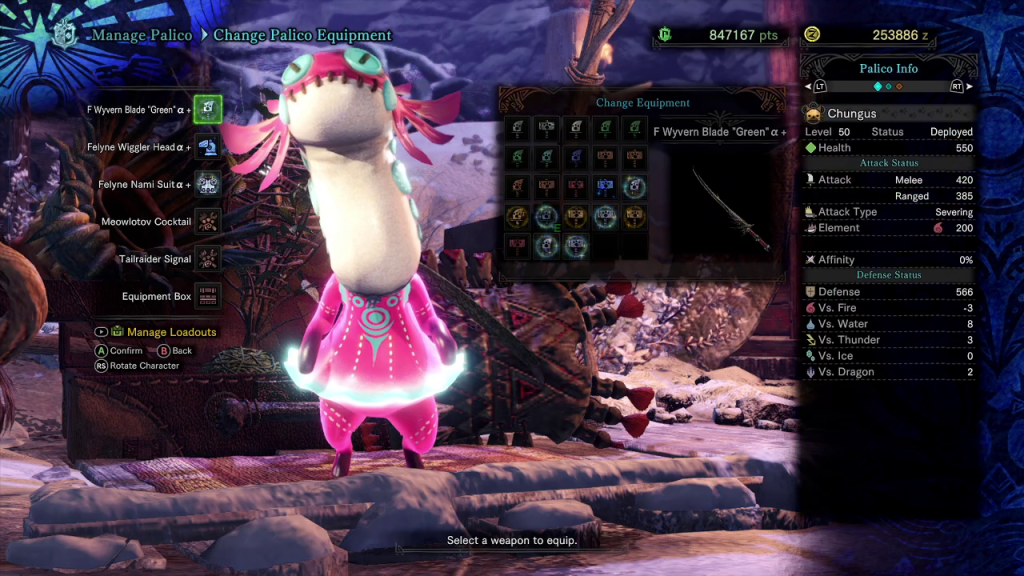
For our trusty Palico we’re bringing the Wyvern Blade and the Meowlotov Cocktail. Giving our Palico an fire weapon will help us to hit our elemental thresholds, doubly so when combined with Meowlotov. The Meowlotov takes on the elemental or status of the Palico’s weapon, so when our Palico uses the multi-hitting fire cracker attack this can potentially do a huge burst of elemental damage to Alatreon on our behalf.
Light Bowgun

No this is not a mistake. The Light Bowgun set is so different from the other weapons that I’ve isolated it within the Fire Build section. Of all the builds I experimented with, this weapon was the one I had the hardest time with. The problem is that ranged ammo doesn’t do a lot of damage to Alatreon and all of its elemental hitzones are pretty poor in the few spots where ranged ammo does really high volumes of damage.
Sadly, the Light Bowgun is the one weapon I could not reliably finish Alatreon with. The problem here is that the best elemental Bowgun is, unsurprisingly, the one you craft using Alatreon’s parts. On top of that, as previously stated, elemental ammo doesn’t do a lot of damage to Alatreon so between that and not having access to what would be the best weapon for the job we’re doing this fight with both hands tied behind our back.
Firstly, we’ve opted out of Coalescence and are instead using Blight Resistance. Blight Resistance fully negates Alatreon’s ability to hit us with any of its various debuffs. We’re using this over Coalescence as we want to maintain as much uptime while attacking as possible. Melee weapons have natural breaks in their attacking strings where it is easy to use a nulberry to cure a status ailment. Ranged weapons don’t require us to stand in striking range, so there are far fewer times when we naturally stop attacking, thus I found it more effective to continually shoot instead of stopping to remove debuffs for a temporary buff.
For a similar reason we’re also making use of a Spare Shot charm. This gives us a change to not use ammo any time we fire our weapon. Obviously the less time we spend reloading the more time we can spend shooting, which is good for our overall damage output. This will also allow us to conserve resources throughout the hunt, which is helpful when the only way to return to camp is through carting.

On that note, I’ve also included Fortify here. If you manage to run out of ammo and need to return to camp, or otherwise get blown up by Alatreon it’s helpful to receive a damage boost so that the cart isn’t a complete waste.
We’re also making use of three levels of Maximum Might. Given we’re using a ranged weapon it is fairly easy to move out of the way of several of Alatreon’s attacks without having to use stamina to dodge roll. This means we can take advantage of the 30% critical that Maximum Might provides as long as we have full stamina. This will also give us 100% critical as long as we attack tenderized parts of the monster, and unlike every other build in this guide we’re not reliant on Agitator so the monster being enraged won’t have any effect on our ability to deal damage.
Mind’s Eye is present to increase our effective range when shooting so that we’re always scoring maximum damage. If you’re a LBG chad and don’t need this skill feel free to slot something else, but I found it rather effective across my numerous trial fights.
For our weapon, unfortunately we need to run three recoil suppresser mods as we’re stuck with high deviation. Without these three mods our shots will fly all over the place, which would be a waste of our precious limited ammo. I’ve also slotted a power barrel so that each of our shots will move through Alatreon a little slower. The monster is fairly large, so this should help us get a little more value from every shot taken.
It’s also worth noting that our weapon has access to both empowered Fire and Ice shots, so we can make use of both elements throughout the fight. This also means that you don’t have to focus on breaking Alatreon’s horns as you can effectively pivot what type of elemental damage you’re dealing throughout the fight.
Generally speaking you’re going to want to try to shoot through Alatreon as all elemental ammo will travel through the monster dealing several hits like pierce ammo. Because of this it is also advised that you keep the wings tenderized. Tenderizing the wings will also tenderize Alatreon’s body. Almost every shot you take is going to pass through this hitzone so keeping it tenderized is essential to completing this hunt with the Light Bowgun.
Finally, I have some equipment alterations compared to other builds in this guide. We’re still going to use the Health Booster for the reasons outlined in How to Heal Through Eschaton Judgement, but we’re swapping out the Temporal mantle for the Glider mantle which we’ll place two level 4 Ice Attack decorations into. In the event that you’re not able to break Alatreon’s horns, or if you need to conserve your flaming ammo during the Dragon active state you can throw the Glider mantle on and pivot to using empowered freeze ammo.
You will also want to give your Palico the Shieldspire gadget. This will allow your Palico to create a dummy that Alatreon will attack throughout the fight, as well as draw the monster’s attention away from you. The best hitzones for ranged ammo are the tail and body, so Alatreon constantly turning its back on you to attack your Palico provides the perfect shooting target.
Items
Here is a blanket one size fits all item set that will work for all of the above sets.
This includes all of the following items:
- 10 Mega Potions
- 2 Max Potions
- 1 Ancient Potion
- 10 Nulberry
- 5 Mega Nutrients
- 5 Astera Jerky
- 20 Fire Herb
- 20 Snow Herb
- 10 Mandragora
- Powercharm
- Powertalon
- Armorcharm
- Armortalon
- 60 Flaming Ammo
- 60 Freeze Ammo
You’ll also want to configure your radial menu like so:

The Max Potion, Flaming Ammo, and Freeze Ammo entries are crafting instructions that will craft as many of the indicated item as possible when the item is selected from the radial menu. Also, the entry for the Glider mantle will update to whichever mantle you have equipped, so it will automatically update for our sets that use Temporal mantles.
This radial will allow you to quickly craft Max Potions on the fly, as well as create additional ammo provided you’re playing a Bowgun. In most cases you’re going to want to use Max Potions to heal off Alatreon’s attacks and this item set gives you seven of them. Make good use of them.
You should save the Ancient Potion for when you cart. Using it will give you a bonus fifty health and stamina, which effectively allows it to function like an additional chef’s choice meal.
Also worth noting, any time you cart you should absolutely restock your items. Chances are while you’re learning the hunt you’re still going to cart so you might as well take advantage of it to resupply.
Food
Before going onto the Alatreon fight eat the chef’s choice platter. This will give you an additional fifty health bringing us up to a total two hundred, which we’re going to need throughout the fight.
If during the hunt you use up your first two carts and are worried about dying again and losing all your progress eat the following meal using a Gourmet Meal Voucher as payment:

This will give you an extra cart and, true to my custom name, acts as an insurance policy. I would recommend only using this meal mid-hunt so as to conserve your Gourmet Vouchers for when you think you might need the extra cart to finish the fight.
Closing Thoughts
Alatreon is an unnecessarily complicated fight in Monster Hunter World, but I hope that the advice I’ve offered here helped you to secure a victory against the beast. A lot of the fight still requires hunters to learn to fight aggressively, but all of the builds I’ve included here should help you to secure numerous kills against this foul creature.
Generally speaking, most of the builds highlighted can be easily altered to accommodate other weapons. However, if there is a weapon I haven’t covered that you’d like me to cover let me know in the comments and I’ll take a look into it. Otherwise I’d like to never fight Alatreon again after having spent the better part of the last two weeks testing numerous builds against it.
Good luck out there and happy hunting.
Did you enjoy what you read? Consider supporting my work by buying me a coffee over on Ko-fi.

This is from so long ago but I still play this when I can, would you try the charge blade for each phase for Alatreon? Sorry, again I’ve never beaten the first of many of this part of the game.
LikeLike
I can give it a shot, and record my thoughts. Charge blade is the weapon I’ve got the least practice with, and it’s been a while since I played World, but I’m sure I can figure something out.
LikeLike
I spent a couple hours doing the fight with a charge blade today. I don’t have a ton of additional notes:
-For Fire Active (The Evening Star), use Velkhana’s weapon instead of Frostfang Barioth
-For Ice Active (Dawn of the Death Star), continue using Rath’s CB
-Terderizing Alatreon’s Arms/Legs + Savage Axe Y/Triangle combo will absolutely shred through the elemental requirement with an elemental phial
-There are a few spots in the fight where you can rip an SAED, but I found Savage Axe a lot more consistent owing to how you don’t get a ton of super large windows
-Savage Axe also requires less maintenance than SAED, so you get a lot more damage up-time that way
-Most of what’s already highlighted in the above builds should work well with Savage Axe, but you can swap out class specific skills (ex. Horn Maestro) for something like Power Prolonger (increases duration of Savage Axe), or Focus (reduce number of hits required to charge your weapon)
Otherwise, there wasn’t anything specifically that I didn’t already mention in the above guide.
A lot of the fight comes down to getting your hits in while Alatreon is attacking by rolling through the attack, and punishing its overly long attack animation.
For example:
-Fire/Ice breath (either grounded, or in the air)
-all of the lightning attacks
-the AOE dragon elemental explosion
-the fire attack that creates the 3 exploding rings on the ground
All of those moves provide you with a ton of time to tenderize, commit to a 1 or 2 hit combo, or heal
Aside from that, you know your weapon better than I do, so I’m sure you can figure out how best to optimize your damage punishes. It’s a tough fight, but you’ll need to have enough damage output to clear it by around the 22 minute mark.
I hope that helps, and good luck. Let me know if you have any specific questions, and I’ll try my best to answer them.
LikeLike
I did the hunt a few more times and have a few other pointers, and 1 correction to my previous advice.
Correction: use the Frostfang Barioth CB, not the Velkhana one. I had a way easier time triggering the elemental thresholds with the strictly higher Ice damage from the Frostfang CB than I did leveraging the elemental phials on Velkhana. That might come down to how I almost exclusively leveraged savage axe mode. If you’re relying on SAED then it might be easier to use the Velkhana CB because it does elemental damage from the phials, but I found savage axe generally easier to play around (tho I don’t main the CB, so your mileage will likely vary).
Additional pointers:
Focus on the front legs, and head once you’ve hit the elemental threshold. This is where Alatreon takes the most damage, and will hopefully help you to demolish large chunks of its health.
Don’t be afraid to tenderize the wings – this will also tenderize Alatreon’s body. Given how large the CB’s swings are, you’ll probably hit the body several times by accident, so this can be a great way to increase your damage output without requiring you to play with surgeon level precision.
Forward + Y/Triangle is an excellent gap closer, and great way to hit Alatreon’s head. After you dodge through (roll through the attack, into a safe area beyond the attack) either of its breath attacks, or the big lightning attack you can use the lunging attack in savage axe mode to absolutely tear through Alatreon’s health with a perfectly lined up headshot.
Don’t overcommit while attacking. Most of the time you’re only going to get 1 swing in before you need to move. Basically any time where I’m not dodging 90% of what Alatreon is dishing out, I’ll lose the fight. Not getting hit is very important for keeping up the required damage you need to deal in order to finish the fight.
Again, hope this helps. It’s a tough as heck fight even when you know what you’re doing, but with some practice I’m sure you can get there.
LikeLike