Hey folks,
I recently rolled credits on Tactical Breach Wizards, and am, once again, sharing my notes. This time it’ll be toward perk selection for some of the different operators that you’re able to play as while going through the game’s campaign. I think a lot of the different perks have value, but there are definitely a few that make completing the optional side challenges (referred to in-game as Confidence Goals) a lot easier.
Anyway, here are my thoughts on which perks help make Confidence Goals, and Tactical Breach Wizards in-general, a lot more easy to complete.
Also, minor head’s up for folks who aren’t super far into the game’s story – I’ve left the fifth, and final member of your squad a secret in this guide’s title headings. I do actually drop their name within their section, but I wanted to respect folks who might be looking for tips well before they reach the final act of Tactical Breach Wizards, so just keep that in mind while navigating the guide.
Table of Contents
Jen
It’s probably not fair to choose a favourite, but Jen was my favourite operator to use throughout Tactical Breach Wizards. It helps that her entire kit is focused on mobility – either allowing her and her teammates to move further, or dislocating enemies from their position. With a few perk points invested she can zip around an entire encounter, and that’s a big part of why many of her Confidence Goals relate to finishing levels quickly. Jen makes it very easy to clean up an entire enemy force in a single turn, and that’s a huge benefit across the entirety of Tactical Breach Wizards’ campaign.
With all that in mind, here are the perks that I recommend grabbing for Jen:
Refreshing Jolt (I & II)
Having the ability to move twice in a single turn is hugely beneficial for a variety of reasons. First, it allows Jen to clean up multiple objectives in a single turn. Being able to lock 2 reinforcement doors is a God send on some of Tactical Breach Wizards’ harder levels. It also allows Jen to reach far away objectives that would normally be inaccessible with a single turn of movement. Both of these factors can allow you to completely flip the script on a level turning it into a cakewalk.
The other major advantage is that Refreshing Jolt allows you to position Jen a lot more aggressively throughout your turn. Case and point: you can have Jen walk up to an enemy, defenestrate them, and then use your additional movement to retreat to nearby cover. This is especially helpful for completing the numerous levels where Zan has a Confidence Goal of finishing the mission while everyone remains at full health.
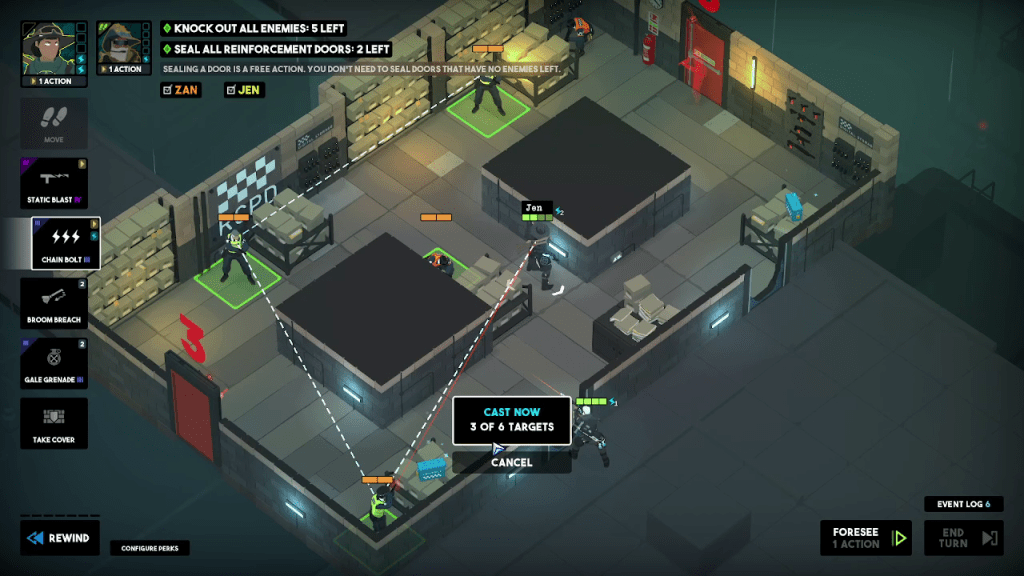
+1 Target (for Chain Bolt)
I feel as though this perk has the most obvious benefit of the lot: it allows Chain Bolt to hit 33% more targets. There are a lot of times where being able to hit 3 targets with Chain Bolt is super useful. This skill goes a long way in increasing how lethal Jen can be, while also continuing to improve her ability to clean up multiple objectives in a single turn. Notably, during Chapter 3 there are several Confidence Goals centered around destroying weapon caches throughout the map, and Jen’s Chain Bolt can be used to destroy some of the more awkwardly positioned caches.
Second Wind
An absolute all-timer. Second wind lets anyone hit by Jen’s Gale Grenade move again. This allows Jen to have absolutely absurd movement potential, but it also allows her to transfer that movement potential to the rest of the team. Heck, if you line up your squad right, you can hit them all with the blast giving the lot an additional turn of movement. You do risk causing damage because Gale Grenade has 1 knockback, but that’s a really low price to pay to support your whole squad with an additional turn of movement once per encounter. As such, Second Wind is a must have skill for Chapters 3 and 4 of Tactical Breach Wizards.
Zan
Zan’s toolkit might not be as flashy as Jen’s, but he has a lot of solid support, and offensive capabilities. Time Boost is one of the best utility support abilities in the entire game, and Predictive Bolt is a very consistent high damage attack that can one-shot the overwhelming majority of the enemies in Tactical Breach Wizards. His supportive abilities are especially notable when it comes to his various Confidence Goals, as many of Zan’s perks help him to actually complete them.
As such, here are my recommendations for Zan:
Time Bomb
Arguably Zan’s best supportive perk. Time Bomb extends the range of his Time Boost so that it can hit all adjacent spaces to your desired target instead of only a single space. Crucially, this allows Zan to refresh the actions of multiple team members with a single cast of Time Boost, instead of needing to spend multiple mana to achieve the same result. This is incredibly powerful on its own, but it also helps whenever Zan has a Confidence Goal wherein the team must collectively use a certain number of abilities in a single turn of combat.

Persistent Delusion
Persistent Delusion is a fun one because it’s really good at preserving Zan’s mana. This will refund the cost of your False Prophet clone when it is destroyed meaning you can use clones a lot more liberally to help draw attention away from Zan. This will let him make use of his Predictive Bolt ability a lot more often since he can’t use it while hiding behind cover.
In addition, this ability also completely shuts down enemy Snipers. You can run the Zan clone into the Sniper’s line of sight so they waste their single shot for the turn. However, because you’re refunded the mana for the clone, you can repeatedly spawn clones to absorb all the Sniper shots. This will allow your team to move freely throughout the map, which is a huge amount of value from a single perk.
You’ll want to grab this perk as soon as you’re able to. It’s genuinely that useful throughout the game.

Conviction
Zan’s ability to deal incredible damage with his Predictive Boly ability is great. You know what’s even better? When he can do that multiple times in a single turn. Conviction refunds his use of Predictive Bolt provided you manage to kill a target with it during your turn. This will let you cleanly kill an existing threat from the map, while potentially allowing Zan to pick up another kill when an enemy reinforcement comes bursting out of a reinforcement door.
Validation
Validation is one of the few perks I’m going to recommend picking up after you’ve grabbed another perk. It synergizes really well with Conviction, and will award Zan an additional pip of mana for killing a target during your turn with Predictive Bolt. This will give Zan more uses of his Time Boost, which I’ve already discussed the benefits of above.
Banks
Jen may be my favourite character mechanically, but Banks is my favourite character in-general. I just love how sassy she is throughout the whole of Tactical Breach Wizards.
That said, we’re not here to discuss character writing – we’re here for mechanics. Luckily, Banks has a lot of solid options for augmenting all of her different abilities. She also has a much wider degree of different types of Confidence Goals when compared to other operators.
Here are my picks for the perks that make her Confidence Goals the easiest to complete:
Drowsy
Drowsy is a bit of a sleeper pick because Banks has so many other perks with a lot more obvious utility. However, there are a few Confidence Goals that require Banks to deal damage with sedation, and doing them without Drowsy is a pain in the butt. Drowsy doubles the amount of damage that you can deal with sedation from a single use of her Sedative Cocktail, which makes any Confidence Goal related to sedation damage a heck of a lot less tedious to complete.
Ideally, you’ll want to pick this up before you begin Chapter 3, which is when those sedation Confidence Goals start to appear.
Big Head
Similar to Drowsy, Big Head is another one that really helps with Banks’ Confidence Goals. There are a not insignificant number of Confidence Goals when you first recruit Banks that require her to hit multiple targets with her Spectral Skull ability. It is possible to achieve all of these goals without the Big Head perk, but having it makes the Confidence Goals a lot easier to actually finish.
I’d recommend grabbing this perk as soon as you unlock Banks. Her Confidence Goals for hitting several targets with Spectral Skull immediately follow her unlocking the use of that ability.
Plus, you can always refund this perk once you make it to Chapter 4 when Banks no longer has Confidence Goals associated with hitting several targets.

Intercept
Okay – now for a Banks skill that I actually think is really amazing: Intercept. This increases the utility of her Death’s Door skill by allowing it to scoop up a nyone that is pushed in-front of it. This makes it way easier to use Death’s Door to completely remove problematic enemies from a level. It also makes any Confidence Goals centered around capturing enemies in Death’s Door a lot easier to complete.
Genius Grant
There are a couple of benefits to Genius Grant. The first is that it can help you with Confidence Goals where Banks needs to transfer a set amount of damage. Usually there is an enemy on the map who can deal 4 or more damage to a single target, and you can use an attack from them to achieve your Transference Confidence Goal. However, if you’re having trouble getting the enemy in question to do the needful, you can always use Transference on an enemy unit, and deal the necessary damage yourself. Genius Grant will then refund your single Transference use, so Banks can use it elsewhere.
The other benefit to Genius Grant is that it allows Banks to get multiple uses out of an ability that can’t normally be used multiple times. The uses aren’t necessarily as strong as protecting one of your allies from taking damage, but it gives you more options for how you approach each turn, and that’s always a plus across the whole of Tactical Breach Wizards’ campaign.

Dall
The immovable bulwark of the team, Dall has access to a lot of interesting abilities. Charge, and Swap both offer her a ton of crowd control potential that rivals the likes of Jen. She can also use her Riot Block to deal insane single target damage that surpasses the likes of Zan.
That said, Dall’s Confidence Goals aren’t strictly related to her skills. In particular, throughout Chapter 3 there will be several times where Dall’s goal is to simply destroy a certain number of weapon caches, or to allow reinforcements to appear on the level. Neither of these requires specific perks to achieve, but the increased difficulty of the fight from allowing reinforcements will require you to get the most out of everyone if you want to survive.
Regardless, these are my recommendations:
Rampage (I & II)
Rampage turns Dall into a killing machine, doubly so when it’s upgraded to Rampage II. This skill is similar to Jen’s Refreshing Jolt, but instead of resetting Dall’s movement, it refunds her action for the turn. This means that as long as you continue to hit something with Charge, Dall can continue to Charge at additional targets. Once I unlocked Rampage II, it wasn’t uncommon to see Dall repeatedly bullying enemies into the corner, off the stage, or bouncing back and forth between 2 targets like a killer pinball.

Swap with Objects
This perk basically just makes Rampage an even better perk for Charge. Being able to use Swap on objects gives Dall a lot more options for repositioning, which can allow her more opportunities to use nearly unlimited Charges to crush your enemies. Notably, this perk lets Dall swap locations with her Riot Block, so you will have full control over where she goes at least once while trying to line up a long Charge combo.
Recall
Recall may seem a little too niche to be useful, but I found it synergizes excellently with Rampage. If you ever need an additional target to reposition yourself while Charging, then you can throw your Riot Block out, and Charge into it. This will almost certainly destroy the block, but Recall will return your Riot Block to you instead of destroying it permanently. This will give you another opportunity to use it for either applying additional Charge damage to a target, or for using Swap to line up another Charge attack.
Mystery Fifth Operator
Reminder, this section contains spoilers for Chapter 3, and Chapter 4 of Tactical Breach Wizards.
Rion joins the party fairly late into the game only really making his presence known throughout Chapter 4. He’s a very potent team member, but I didn’t find many of his perks especially useful for completing his own Confidence Goals. That’s not necessarily a bad thing though – it just means I have less to say about him.
Either way, here’s what I recommend picking up for Rion:
Intelligent
This perk has a ton of utility. Intelligent prevents Rion’s Spore Bomb from doing damage to friendlies, but it will count them as part of its damage calculation. This means that you can significantly drive up the damage of a Spore Bomb by running a few of your team members into the blast zone, which can help with Confidence Goals where Rion needs to score +12 damage on a single bomb use.
It’s also just nice when you can do a lot of damage to baddies when they pile into a specific location on the map.

Corrosive
Simply put, Corrosive helps to make Banks significantly more useful in Chapter 4. Chapter 3 introduced enemies who are immune to Sedation until you’ve done a couple points of damage to them. Corrosive allows Rion to remove all Sedation protection from a given enemy with a single use of his Brittling Dart. This will allow you to get more value out of Banks, especially when it comes to moving bulky enemies that normally resist knockback damage.
If you made it this far, thank you for reading. I hope the different recommendations in this guide help you with both completing Tactical Breach Wizards, and with cleaning up all of those optional Confidence Goals. I had a lot of fun playing through it myself.
Also, it’s probably clear, but I didn’t recommend full builds – just stuff to help with Confidence Goals. I’m fairly certain most players can sniff out the best perks for each character, most of which I didn’t actually list in this guide. However, if that’s something that you’d find valuable, or want my opinion on then please let me know.
Otherwise, if you have questions, or want to argue with me about something then you can sound off below in the comments.
Did you enjoy what you read? Consider supporting my work by buying me a coffee over on Ko-fi.
