
I recently had the opportunity to review StarVaders, and thought it was a fantastic game.
However, there’s no denying that StarVaders can feel like an incredibly difficult game when you’re just starting out. The tutorial does a great job of introducing the player to the various different pieces of the game, but from there you’re left largely to your own devices.
While I’m a fan of learning through mistakes, I know not everyone is. As such, I wrote down what I hope will be a useful primer to help struggling players to get started.
Also, before we start I’d like to remind anyone reading that you are free to ask any questions in the comments section. I read them all (mostly for moderation purposes), and will try to answer them to the best of my abilities.
Okay – with that out of the way, let’s get into the guide.
A Small Deck is a Consistent Deck
It’ll probably feel like an obvious piece of advice for anyone who’s played a lot of card games, but it’s far easier to pilot a small deck to victory.
The reason for why small decks are better is simple: you’re more likely to draw your key cards in a smaller deck. For example, in a 12 card deck, it’ll take 3 turns before you draw every card in your deck. If you’re working with an 8 card deck, that number is reduced by 33% down to 2 turns. This dramatically increases the likelihood that you’ll draw your important cards, which will increase the consistency of the strategy that your deck is designed around.
If it helps, you could also think about this like skill cooldowns. Each card in your deck is like a skill in an RPG, and the frequency that you can draw the card determines how long the skill is on cooldown after use. A smaller deck increases the frequency that you’ll draw the card, ergo it has a shorter cooldown.
Either way, you’ll want to make good use of card removals while visiting Min’s shop before you challenge the boss of each act in StarVaders.
That raises another question though: which cards should I remove?
Generally speaking, if a card doesn’t contribute to your deck’s overarching strategy, then you should remove it from your deck. That’s a little murky though, so let’s examine an example to explain what I mean:

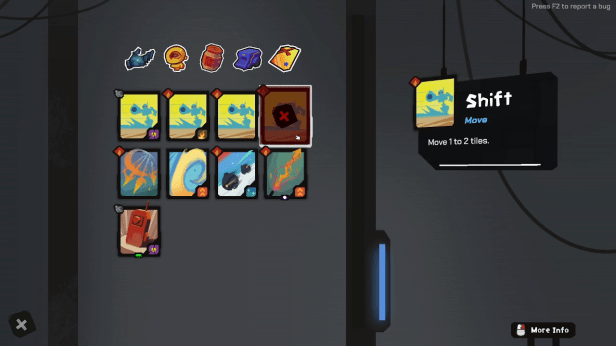
You can see here a deck that I had while playing Noel, which was built around Plasma Fire. This card shoots a bullet that chains to nearby targets once for every Burnt, or Junk card that is in your discard pile, or hand.
I’ve also got a Shift, and Remote card that are both upgraded with the Broken modifier, so they generate Jam (a common Junk card) in my hand.
As such, my basic game plan is to draw Shift, and Remote, play either card to position myself, and then unleash Plasma Fire when I have a Jam (or multiple Jams) in my hand.
With that in mind, it’d behoove me to remove some of the cards from my deck so that I can draw Plasma Fire more frequently. As such, I can afford to remove most copies of Flurry Fire, and Artillery Strike from my deck. I actually opted out of removing all 3 Flurry Fire so that I’d have an additional attacking card just in case of emergencies. As such, my final removal was for an unmodified version of Shift, which brought me down to the minimum deck size of 8.
This, in combination with the different artifacts that I’d gained on the run, meant I was able to draw Plasma Fire almost every single turn. Thus, I was able to clear out the game board with a lot of consistency, while also maintaining a high combo count (more on that later).
Here’s a video showing how well the deck worked after I’d trimmed out all of the unnecessary cards:
Learning to thin out your deck is a skill, so you’ll have to develop your abilities at it while you’re playing StarVaders. My example above is fairly straightforward, but you’ll likely find that many of your decks are a little messier. Don’t worry – I still have messy runs of StarVaders too. What’s important is that you start thinking about which cards make the most sense to remove, and learn from both successful, and failed runs.
However, I’ll leave you with a general rule that I try to follow while playing: 4 cards with movement effects, 4 cards that deal damage, and a utility card. This should ensure that you’re drawing a movement card, and a card that deals damage every single turn while playing with the minimum deck size of 8.
Don’t be afraid to break my guideline though. It’s simply a suggestion to help get you started with slimming down your deck.
Combos Are Key
Now that I’ve spent an entire section of the guide talking about card removals, let’s discuss how you’re actually meant to pay for them: combos.
One of the key differentiating factors of StarVaders from other card games is that it features a combo counter. This isn’t just for stroking the ego of particularly skilled players though: combos increase the amount of currency that you earn from kills. That means that simply killing all of the oncoming invaders isn’t enough to succeed in StarVaders – you also have to reliably pull off combos, so that you can accumulate the resources to properly construct a strong deck.
As far as how the scaling for combos works, it is multiplicative. Every time you defeat a foe, your combo count is increased by 1, and the enemy’s bounty is multiplied by your combo. You’re then paid out stars (money) equal to the result of that calculation.
For example, if you kill a Shooter, which has a bounty of 100, and this kill bumps your combo up to 4 then you’ll earn 400 stars for killing it.

This multiplicative bonus caps out at x5, so any kills earned after reaching a combo of 5 will provide the maximum value of stars. If at all possible, you’re going to want to kill as many high value targets as you can with a combo of 5 or higher.
There’s a final piece of information I want to leave you with before I move on: consider the order you kill enemies. Every enemy in StarVaders has a different bounty value, so you’ll get the most bang for your buck if you kill high bounty enemies later in your combo. For example, would you rather earn 500 stars for killing a Shooter, or 2500 from killing a Time Angel? I’d rather cash in on the Angel.
It’s also worth calling out that some enemies have a bounty of 0, and thus should be used to drive up your combo multiplier earlier on in a turn. For example, Ticks don’t provide any payout, so it’s better to kill them at a lower combo.
If you’re curious about what bounty each enemy type has, then you can verify this information by right clicking the enemy and inspecting their info tab.
Don’t Forget to Spend Your Chronos Tokens
Honestly, I’m guilty of doing this.
It’s really tempting to hold onto your Chronos Tokens just in case you need them, but don’t let that deter you from using them outside of battle. You can use Tokens to reroll your rewards, which can be useful for fishing for a particular Component upgrade, or Artifact that’ll take your current deck to the next level.
Remember that every combat encounter (aside from boss encounters) has a Time Angel who rewards a Chrono Token. This means that you’ll earn quite a few additional Tokens during your run, so you don’t want them to go to waste.
Worst case scenario, if you have leftover Chronos Tokens after finishing the boss for an act, you can spend the remainder while searching for a specific legendary artifact. There are 2 reasons for this. The first is that your Tokens are refreshed when you start a new act, so the boss reward for an act is the last moment to spend them.
Additionally, most legendary artifacts have extremely specific deck styles that they work best with, and there is a limited pool of them available. This makes it a lot easier to pull specific Artifacts after beating a boss, which can easily transform an otherwise unremarkable deck into something truly special.
You Need Horizontal Attacks
One of the things that I think is a little counterintuitive about StarVaders is the value of cards that allow you to attack left, or right. What I mean is that the game’s tutorial hands the player a couple of cards that primarily allow them to attack straight ahead. This, coupled with your goal being to keep the bottom 3 rows clear, can somewhat erroneously teach the player that they’re meant to defend the bottom 3 rows akin to a goalkeeper in Football, or Hockey.
However, it has been my experience that StarVaders is much easier (or rather, decks are made more effective) when players are able to attack at all angles
Here’s a short example to highlight what I mean:

Given the above scenario, if I wanted to take out the enemy to my left then 1 of 2 different scenarios needs to take place. Either I move in front of the enemy and attack them, or simply attack to my left. In the first scenario, I’d need to burn 2 energy (and cards) to eliminate the problem, whereas the second only requires 1 (of each). This makes it more efficient meaning that I can continue to play more cards afterwards.
Though, I’ll admit, in that specific example being able to play more cards won’t help me since I don’t have any more attacks, but that’s besides the point.
Either way, that is the power of cards that can attack horizontally: they allow you to attack in multiple directions. In the best cases, this will help you to save your movement cards, and string together longer combos.
It’s also worth noting that this makes it easier to clear out enemies who actually make it into the bottom 3 rows, as you’ll be able to defeat them from a larger variety of angles. When you can only attack forwards your ability to clear out the bottom 3 rows is severely limited.
Either way, I hope this has helped to explain the variety of upsides that exist when you can attack enemies on either side of you.
Always Look for New Synergies
For my final piece of advice: look for synergies.
For those who aren’t familiar with that term, synergy refers to when 2 cards with different effects have some sort of interaction that causes 1, or both cards to improve in some way. For example, the mechanic Flow causes Flow cards to become free when they enter the player’s hand. This naturally synergizes with cards that allow the player to draw new cards into their hand because the draw effect will trigger Flow.
StarVaders is chock full of these tiny interactions, and consistently winning runs (as well as beating its higher difficulties) largely comes down to identifying, and capitalizing on synergizes.
Keep in mind that synergizes don’t just exist between cards: artifacts can also help to create synergizes. For example, if you have cards that actively create junk like Bash then you’ll find artifacts like Jester, or Insulation quite useful. The former gives a random upgrade to every junk card that enters your hand, allowing them to have playable effects, while the latter causes you to draw additional cards anytime junk enters your hand. In either case, an interaction that’d normally be negative can be spun into a part of your game winning strategy.
I can’t outline every single synergy in StarVaders for you, but here are a couple more examples of what I mean to help drive the point home:
Gift Card + Broken Component: Broken changes a card’s cost to 0, but causes it to generate Jam cards whenever played. Gift Card returns a 0 cost card to your hand every turn. Paired together, Gift Card will repeatedly return any card with the Broken component to the player’s hand every turn.
Insulation + Plasma Fire: Insulation causes the player to draw additional cards whenever they draw a Burnt or Junk card. Plasma Fire chains to additional targets for every Burnt or Junk card in the player’s discard pile, or hand. As such, Insulation can help the player to draw Plasma Fire whenever they draw several Burnt or Junk cards, which helps to increase Plasma Fire’s damage potential.
Multi-Pass + Teleport: Multi-Pass makes a random card with 2 effects free every single turn. Teleport has 2 effects (move anywhere, and draw a card), but increases in cost every single time it is played. However, Multi-Pass can bypass the increasing cost of Teleport by making it free for the player to use.
Tactical Component + Flow cards: Tactical adds a draw 1 card effect onto any card. Flow cards are free when they’re drawn, or picked up during the player’s turn. Ergo, Tactical Components can make it more likely that you draw Flow cards, which you can freely play during your turn.
Meteorfall + Arcane Component: Cards with the Arcane Component reduce the cooldown of a random spell by 1 turn. Meteorfall has a cooldown of 9 turns, and starts on cooldown during every combat encounter. Having cards with the Arcane Component can help to reduce Meteorfall’s enormous cooldown, so players can unleash its devastating 15 attack flurry much faster.
Hopefully that has gotten your brain turning, so that you can identify some more synergies on your own. As with knowing which cards to remove (which was discussed earlier in this guide), this is a skill that you’ll cultivate over several runs of the game. It might be difficult to spot these powerful combinations at first, but the more synergies that you find the easier it will be to find more of them.
I think that’ll do it from my end. There was a lot to cover in there, but I hope that it helps anyone who’s struggling to consistently finish runs.
Honestly, StarVaders, like so many other Roguelikes, has a very high learning curve right out the gate. However, the more you learn about it, the easier it’ll become to actually win.
As always, I do read all of the comments, so if you have any questions I can try to answer them for you.
Otherwise, best of luck, and I hope what I’ve written here helps you to win.
Was this guide helpful? Consider supporting it, and similar work like it by buying me a coffee over on Ko-fi.
