
With the 1.0 release of Timberborn just around the corner, it felt like a good time to share some of my experience playing the game. There was no short supply of things that I learned by repeatedly flailing, and failing about as I got my head wrapped around all of the game’s systems. That said, I’ve managed to capture some of my biggest stumbling blocks here, so that hopefully you have a much smoother time getting into Timberborn.
That said, let’s get into it.
Beavers Travel Everywhere in Real Time
This feels obvious in hindsight, especially given how often other City Builders are implementing it too.
Regardless, everyone in Timberborn moves around your settlement in real time, and that leads to some interesting gameplay implications that you’ll want to account for:
1. Where You Place Storage Matters
Unsurprisingly, where you place your storage buildings has a huge impact on the overall efficiency of your settlement when beavers can’t simply teleport everywhere. For example, if the Large Pile that collects Logs is 200 meters away from the Lumberjack Flags that harvest logs then it’ll take substantially longer for your workers to deposit their collected Logs than it would if the Large Pile was 10 meters away.
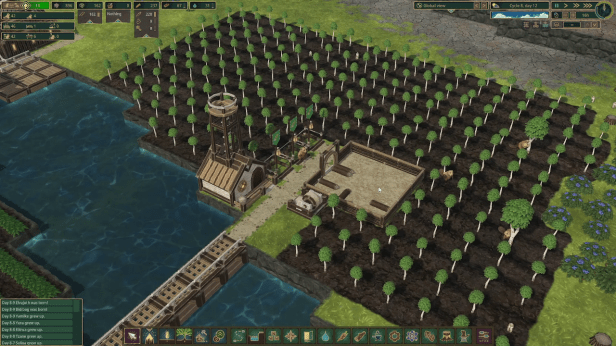
As such, you’ll want to place relevant storage facilities near where they’re most useful. That means placing a Large Pile that collects logs near your Lumberjack Flags, Warehouses for food (Carrots, Grilled Potatoes, Bread) nearby Farms, Grills, and Bakeries, and so on. This will dramatically reduce the time that your beavers spend hauling produced goods around your settlement, which will increase the overall speed that they can produce new goods.
2. Make Use of Haulers
I wish I’d figured out how to use Haulers earlier. They’re so useful.
The short version is that Haulers will move goods around your settlement. This is the foundation for how you keep your entire settlement running efficiently without needing to cram all of the pieces of your production chain into a single spot.
As a quick example, let’s use Planks:
- Logs are collected at a Lumberjack Flag
- The Logs are moved to a Pile when the Lumberjack Flag’s storage is at capacity
- A worker from the Lumber Mill collects Logs from the storage Pile, and places them in the Lumber Mill
- The Logs are then processed into Planks at the Lumber Mill before being moved to storage
Now, in a perfect world, your Lumber Mill would be right next to your Lumberjack Flag, so that Logs could be moved from one building to the next. Unfortunately, that won’t always be the case since Lumber Mills need power to operate, so you’ll want to build them close to your power generation (which will likely be near water). As such, there will almost certainly be some distance between your Forestry/Lumberjack Flags and your Lumber Mill.
This is exactly the scenario where we want to make use of Haulers. They can help to fill the geographical gaps, so that our workers at either end of our production chain can continue to work as efficiently as possible.
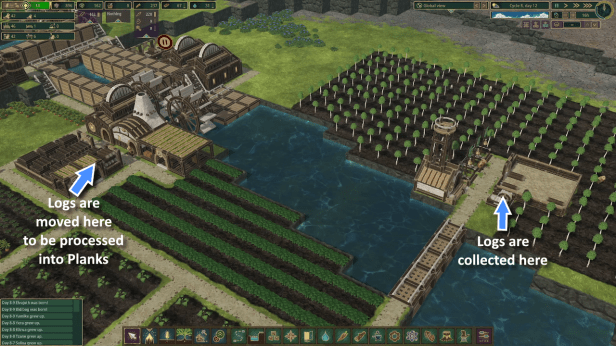
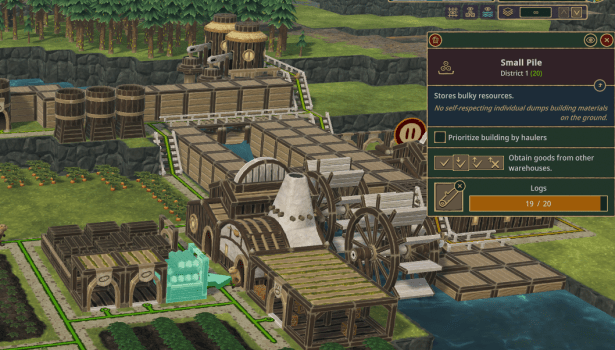
To do this, we can build a Pile for Logs near both the Lumberjack Flag, and the Lumber Mill. Then, you can set the Pile that is close to the Lumber Mill to Obtain, as seen in the attached screenshot, which will notify a Hauler to fill it with relevant goods until it is full. This will keep a steady supply of fresh Logs available for your Mill.
The result is that most of your workers can continue to do their job at peak efficiency, while you rely on Haulers to run around your settlement.
It’s also worth noting that you can use Supply to tell Haulers to take resources from a specific Pile in order to fulfill any outstanding Obtain instructions. This isn’t required however. By default, Haulers will take the most efficient path to resupply Obtain instructions, so this is only truly relevant when you need to shuffle resources between Districts.
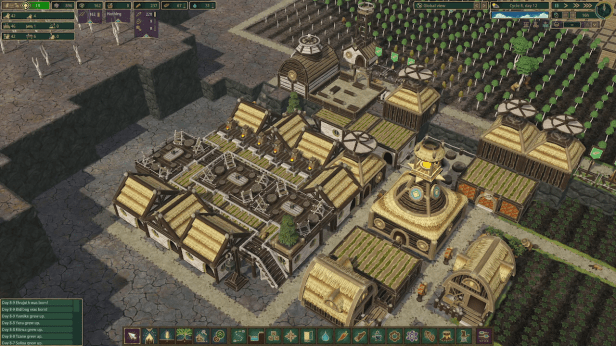
3. Keep Entertainment, Enrichment, and Decorations Near Housing
It can be challenging to anticipate exactly how your beavers will move around your settlement. This is doubly true if you’ve built a spaghetti mess of roads, which is inevitably what I end up doing.
Regardless, there is one certainly in Timberborn: beavers will return home at night to sleep. Ergo, you know exactly which areas to place all of your decorations, and buildings that boost Well-Being – place it all nearby your housing.
Keep that in mind so that you can maximize the benefits that you receive from any of the additions that you make to your settlement. Ideally you want everyone to pass by each type of decoration daily, so as to maximize your Well-Being bonuses from beautification.
This is doubly true for Monuments, which are criminally expensive to build but provide an enormous boost to Well-Being. You really want everyone to pass by those once a day, so that you can reap the rewards of your investment.
Try to Maximize Well-Being
It’s been so long since I completed the tutorial in Timberborn, but I don’t remember it explicitly calling out the different bonuses that are accumulated from increasing your settlement’s Well-Being. Nor can I find any in-game resource that explains the benefits in detail. As such, I’ve recorded them here:
- Beavers work faster
- Beaver grow to adulthood faster
- Beavers move faster
- Beavers live longer
The exact bonuses vary quite a bit, but they can be found on the Timberborn wiki.
Though, I personally find the table there quite challenging to read, so I’ve cleaned it up a little into a format that I think is a little easier to parse. Feel free to use whichever makes more sense to you.
| Well-Being | Work Speed | Growth Speed | Move Speed | Life Expectancy |
|---|---|---|---|---|
| 2 – 4 | +0% | +0% | +5% | +0% |
| 5 – 6 | +20% | +5% | +5% | +0% |
| 7 – 9 | +20% | +5% | +5% | +20% |
| 10 – 11 | +40% | +10% | +5% | +20% |
| 12 – 13 | +40% | +10% | +15% | +20% |
| 14 | +40% | +15% | +15% | +20% |
| 15 – 16 | +60% | +15% | +15% | +20% |
| 17 | +60% | +15% | +15% | +40% |
| 18 – 19 | +60% | +20% | +15% | +40% |
| 20 – 21 | +80% | +20% | +15% | +40% |
| 22 – 24 | +80% | +25% | +30% | +40% |
| 25 | +100% | +25% | +30% | +40% |
| 26 | +100% | +30% | +30% | +40% |
| 27 – 29 | +100% | +30% | +30% | +60% |
| 30 – 31 | +120% | +35% | +30% | +60% |
| 32 – 33 | +120% | +35% | +40% | +60% |
| 34 | +120% | +40% | +40% | +60% |
| 35 – 36 | +140% | +40% | +40% | +60% |
| 37 | +140% | +40% | +40% | +80% |
| 38 – 39 | +140% | +45% | +40% | +80% |
| 40 – 41 | +160% | +45% | +40% | +80% |
| 42 – 44 | +160% | +50% | +50% | +80% |
| 45 | +180% | +50% | +50% | +80% |
| 46 | +180% | +55% | +50% | +80% |
| 47 – 49 | +180% | +55% | +50% | +100% |
| 50 – 51 | +200% | +60% | +50% | +100% |
| 52 – 53 | +200% | +60% | +60% | +100% |
| 54 | +200% | +65% | +60% | +100% |
| 55 – 56 | +220% | +65% | +60% | +100% |
| 57 – 59 | +220% | +65% | +60% | +110% |
| 60 – 61 | +240% | +70% | +60% | +110% |
| 62 – 66 | +240% | +70% | +65% | +110% |
| 67 – 69 | +240% | +70% | +65% | +120% |
| 70 – 71 | +260% | +75% | +65% | +120% |
| 72+ | +260% | +75% | +70% | +120% |
The bonuses are fairly hefty, so they’re well worth pursuing as you grow your settlement. Personally, I find food related bonuses the easiest to start with as Carrots, and Sunflowers are both easy early game crops to manage, which produce a ton of value. You can also place Shrubs, Beaver Statues, and Lanterns to get some easy Well-Being points for having a beautiful settlement, and make use of Rooftop Terraces, and Contemplation Spots for an easy enrichment bonus.
I’d only recommend delving into Wet Fur bonuses like the Lido, and Showers once you’ve managed to secure your water source through Droughts, which will be covered in a later section of this article.
Additionally, Monuments provide a huge bonus to Well-Being, but are designed with excessive requirements. They’re best left until you have an overflowing excess of resources, and nothing to spend them on.
How do I Build a Reservoir to Survive Droughts?
Very early on, Timberborn is going to hit players with their first exposure to one of the game’s 2 climate related challenges: droughts. This will stop all incoming water from flowing throughout the map, which has a handful of negative side effects:
- Arable land will dry up, which prevents crop growth and kills existing crops
- Drinking water can no longer be harvested
- Showers, and Lidos stop functioning
- Water born crops wither, and die
- Water Wheels stop functioning
That’s a lot of negatives. Fortunately, you can mitigate some of them by building a reservoir to supply your settlement with water throughout the dry season.
Basically, you want to trap a body of water that can sit completely unmolested throughout the entirety of a drought. To do this, we can make use of both Dams, and Levees, though Levees will be our primary focus for trapping water.
Here’s an example to illustrate what you’ll want to do:
As you can see, we’ve used Levees (the solid wooden walls) to create a structure that can trap, and hold an abundance of water. This will continue to irrigate the surrounding area throughout the Drought, while also allowing water dependent buildings (ex. Lido, and Shower) to continue functioning.
It’s also worth noting that water will continue to build up in a location until it finds a spot where it can escape. As such, I’ve included a few Dams on the far end of the reservoir so that during the Temperate season, water can continue to flow seamlessly. This is important because if you fail to provide a way for a little water to escape, then your reservoir will eventually overflow, and drown your settlement.
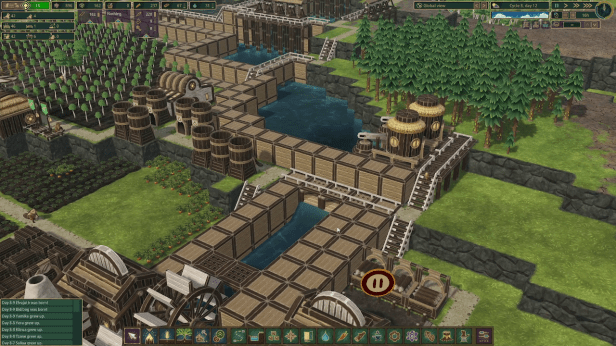
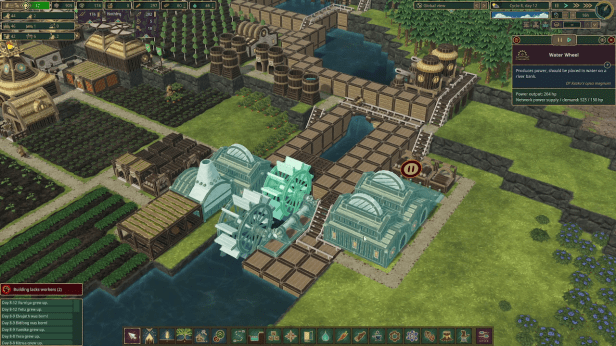
Use Levees to Increase Power Generation
One of the more efficient ways to generate power is to place Water Wheels into running water. This will cause the Wheel to generate power, which you can leverage across a wide variety of manufacturing buildings.
However, Water Wheels do not output a static amount of electricity. Instead, the output of Water Wheels depends on the current of the water. That is, if the water is moving faster then the Water Wheel will generate more power. If the current is slow then the Wheel will generate substantially less power.
As such, we can make use of Levees to constrict the flow of water, which will increase the speed of the current. Here’s a small example of what I mean:
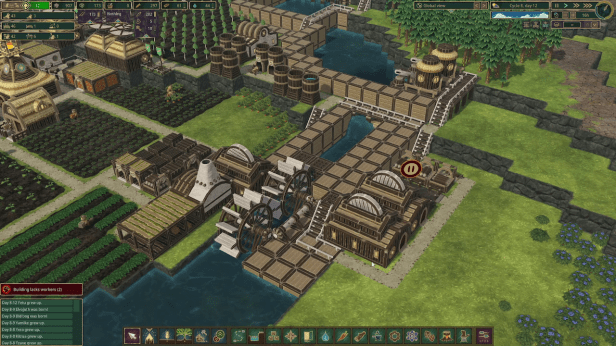
As you can see, I’ve built Levees that force water down 2 distinct paths in my settlement. Just for comparison’s sake, this setup was generating ~300w before, and ~550w after I added the Levees. It’s a little awkward to implement, but the increase in power generation more than makes up for it.
Plus, you can use the additional space afforded by the Levees to build out your manufacturing district.
Buildings That Use Power are Capable of Transferring Power
I feel a bit stupid for not realizing this earlier, but you don’t actually need to build Power Shafts that connect to every single building that needs electricity to operate. Instead, you can transfer electricity through any building that uses it.
Ergo, if you have a couple of different factories that you want to build next to one another then you only need to connect 1 of said buildings to a power source. The rest will be powered automatically as part of the overall network. You can actually see this relationship if you click on any of the Power Shafts, or power generating buildings within the network to see all of the different nodes that are a part of it. All nodes will appear highlighted in blue:
It’s also worth noting that building several Power Shafts in a condensed space does cause Timberborn to run worse. As such, it’s worth making your power solution with as few (moving) pieces as possible. Never mind, it’ll save you materials that you can spend on other projects throughout your settlement.
How do I Survive Badtide?
This is always a fun one to answer. The first Badtide will happen in year 7, and will probably jump scare most new players. It causes Bad Water to flow from all water sources on the map, which can completely decimate the settlement of an unprepared player.
However, Badtide is fairly simple to deal with once you’ve set up a proper solution for it.
Basically, you want to create a T Valve. If you don’t know what that is, here is a picture to illustrate the concept:
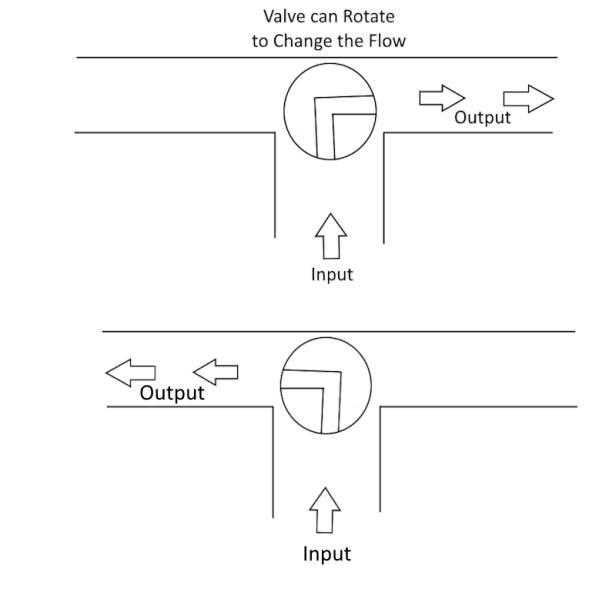
The idea is that we have 3 different channels, but we’ll only make use of 2 of them at a time. During Temperate weather, we’ll allow water to flow in from our water source, throughout our settlement. However during the Badtide, we’ll shut off access to the water channel through our settlement, and instead open up an additional third channel that’ll direct the Bad Water away.
To do this, we’ll need to make use of Floodgates that we can manually raise, and lower during the start of various weather effects.
Here’s an example of a T Valve that I built in one of my settlements:
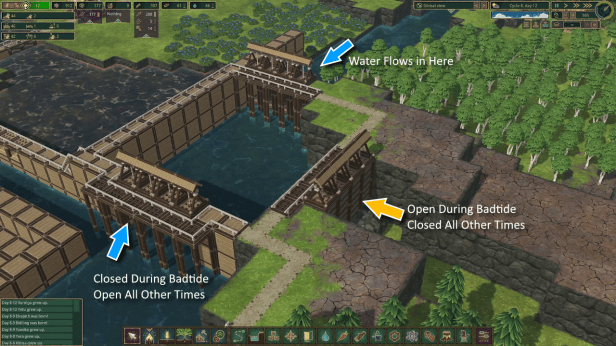
It’s also worth noting that you might want to build larger Floodgates if the flow of water proves too strong during Badtide. Personally, I like using at least 4 Double Floodgates. This creates an enormous gap for all of the Bad Water to quickly filter through so that the T Valve doesn’t overflow, and pollute my settlement.
You Can Build Paths Over Dams, and Underwater
This is very useful to know right out the gate: you don’t actually need to build bridges to cross water. That’s a good thing since bridges are locked until you hit the mid-game. Their intended purpose is to connect massive skyscrapers that you’ve built across your settlement.
As such, when it comes to crossing water, beavers can simply take a quick dip. All you need to do is build stairs that lead in, and out of water, and connect them with a path through the water. Don’t overcomplicate things – beavers can swim, and actively enjoy getting wet in Timberborn.
Alternatively, you can build pathways across any of the Dams that you’ve built throughout your settlement. This is a really easy way to scoot across the river in the earlier game, and access the arable land that sits on the other side of most water sources.
Have Excess Beavers Work in Research and Development
I’ll be perfectly honest: I’m somewhat annoyed by how your population is so hard to accurately manage in Timberborn. Even with a massive Well-Being bonus, Beavers will die of old age eventually. At that point, they’ll need to be replaced by a new beaver, which leads to a bit of lag-time where you’re waiting for a child to grow into an adult. The result is that your workforce will always be in flux.
As such, I tend to keep anywhere from 5 to 10 extra beavers around as floaters. This will ensure that all of the important jobs in my settlement are being looked after, while non-critical ones can go through periods of inactivity when large groups of older beavers pass away.
However, it’d be a waste for 10 beavers to be hanging around doing nothing, so I tend to keep 10 extra Research jobs available at all times. This ensures I have somewhere to shuffle extra workers when they’re available, and I can easily pause operations when my population has dipped.
You Can Clear Out Resources That You Aren’t Using
Simply put: you don’t need to keep the mountain of berry bushes that are given to you at the start of your playthrough. Once you get into farming, you can clear them out, and turn all of the arable land into farmed crops instead.
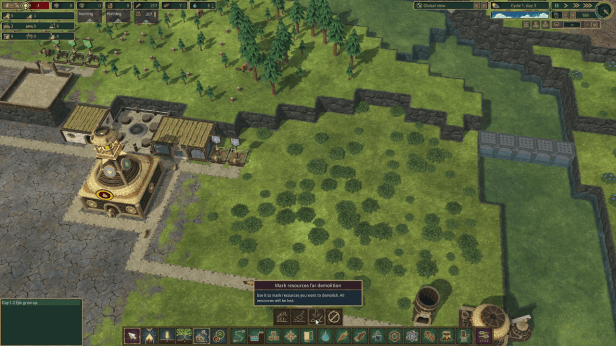
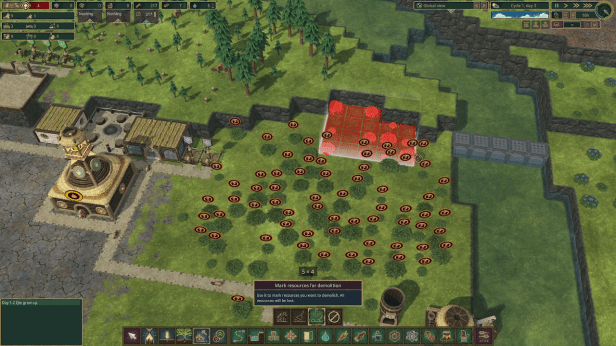
To do that use Mark Resources for Demolition (as seen in the attached screenshot), and some of your workers will show up to clear out the bushes when they’re available.
And with that, I think I’ve covered all of the major things that tripped me up across my first several hours of playtime. Hopefully, you learned something, and can apply it during your next play session. Timberborn is an incredibly fun game once you get over that initial learning hump, and it provides so many interesting ways for players to engineer solutions to its various challenges.
Did you enjoy what you read? Consider supporting my work by buying me a coffee over on Ko-fi.
