
Welcome to the Jellyfish Pirate Crew!
In this guide we’ll be covering some basic combo routes for May in Guilty Gear Strive.
After pouring hours into playing May, I decided that I wanted to create a resource that could help onboard new players. She’s a fantastic character with great mobility, huge damage, and is cute as a button.
My hope with this guide is to help build a foundation for players that are new to Guilty Gear Strive, or fighting games in general. That said, we’ll be discussing a variety of different combos that aim to familiarize you with May’s specific rhythm.

A note before we start: few if any of the combos highlighted here are optimal. My target audience is new players, and the optimal damage routes on May can be quite fiddly, or difficult to execute. That said, the combos highlighted here will help provide the building blocks to eventually learn those optimal routes. I’m looking to teach you to walk, so that you can teach yourself to run when you’re ready.
Editor’s notes (2026-04-12): all of the old routing should still work just as well as it used to even after the 2.0 updates. If you find any errors, give me a shout in the comments, or over on yt comments. Whichever works best for you.
Whoop. I forgot to remove the Wild Assault content from the guide. It should now actually be up to date. Thanks for reading!
Table of Contents
- Combo Notation
- Terminology Reference
- How Do I Perform Charge Special Attacks?
- The Basics
- Corner Combos
- Roman Cancels Combos
- Charged Dust
- Tick Throws
- Split & Step Off
- Combo Reference
- Additional References
- Legacy Content
- Acknowledgements & Thanks
Combo Notation
Before we start – some house keeping.
Here is how I’ll be writing the combo notation within this guide. This mirrors the notation that is used by the Guilty Gear wiki Dustloop.
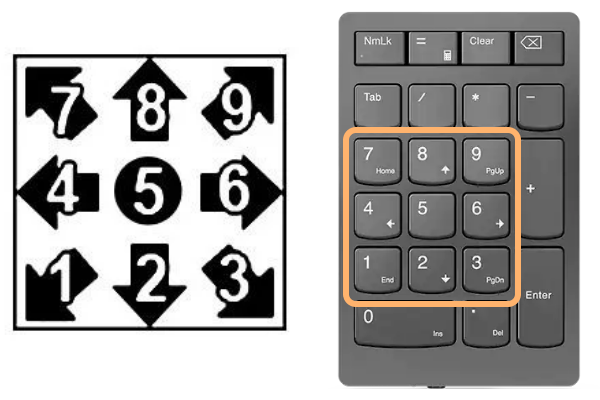
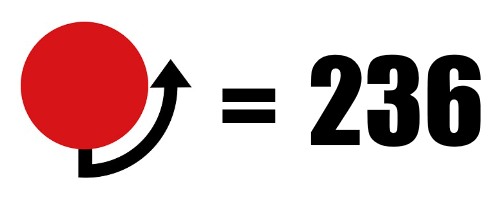
Following our annotations above, 8 would correspond to up, 4 would be holding back, 6 is pressing forward, and 2 is holding down. 7, 9, 1, and 3 are the diagonal directional inputs between our 4 cardinal directions, and 5 is a lack of any kind of directional input. In this way, forward punch would be written as 6P, while a crouching kick would be 2K. Furthermore, a quarter circle input would be written as 236, which mirrors the rolling motion of the stick with the corresponding numpad values.
In addition, I’ll be copying the Dustloop shorthand for the following:
- c.S = close slash (when you use S close to the opponent)
- f.S = far slash (when you use S far from the opponent)
- j.X = jump attacks
- [X] = hold this input
- (ch) = counter hit
- WS = wall splat
- RRC = Red Roman Cancel
- dl = delay (short pause before next button press)
- ad = Air Dash (you will want to map the dash macro input for this)
Terminology Reference
Here is the list of jargon used throughout this guide. I’ve included links to the applicable definition within the fighting game glossary by Infil. This is an extremely powerful resource that you should keep in mind if you ever run into terminology you don’t understand when it comes to fighting games.
- Charge Input
- Command Normal
- Counter Hit
- Disjoint
- Hit Confirm
- Midrange
- Motion Input
- Normal
- Overhead
- Poke
- Pressure
- Punish
- Recovery
- Strike/Throw & High/Low Mixups
- Tick Throw
- Wall Splat
The following are all Guilty Gear specific terms:
How Do I Perform Charge Special Attacks?
As a quick primer, May is a charge character. This is a distinction provided to fighting game characters that use charge inputs for (some of) their special moves instead of motion inputs.
But what is a charge input? In simplest terms, it requires you to hold a specific movement direction for a set amount of time to “charge” the attack. Then you press in the opposite direction (plus an attacking button) when you want to use your special move.
For an example of this in action, we can look to May’s Mr. Dolphin special attacks. In the following video, you’ll notice how I’m holding down-back for a set period of time, before pressing forward + S to use Mr. Dolphin.
This emphasis on charged special attacks gives May a fairly unique cadence when compared to other characters. Unfortunately, it also means that you’re going to have to learn to charge mid-combo so that you can access even the most basic of May’s combo routes.
Luckily, Guilty Gear Strive’s charge time – the amount of time that you need to hold the opposite direction to charge an attack – is only 25 frames (about half a second). This means that there are plenty of opportunities wherein we can obtain a full charge mid-combo because many of May’s normal attacks let us buffer the charge.
It’s also worth noting that in the overwhelming majority of cases you’ll want to charge by holding down-back (1) in the middle of your combos. This will give you access to either version of May’s Dolphin special attacks, and will also get you in the habit of crouch blocking which is generally helpful for blocking incoming attacks.
You’ll likely notice that I do this a lot myself in the attached videos. Keep that in mind if you’re struggling to perform a combo. I do keep the full input display for what I’m doing included in all of the videos, so try to mirror what I’m doing with my hands if you’re stuck while performing a particular combo.
The Basics
In a previous iteration of this guide, I had different combos split out by the ranges where you’d be using them.
Based on Youtube analytics, I’m not entirely certain that was the best way to break down the various pieces of this guide. Therefore, I’ve rewritten this section to cover off all of the basics that I think you should learn for playing May.
The focus here is to provide you with a strong foundation that will (hopefully) let you start winning some matches. Then you can refine, and iterate depending on your motivation levels by learning more advanced combos, which I won’t be covering in this guide.
Basic Close Slash Combos
Okay, so in an older version of this guide I recommended learning the following combo:
c.S > 2H > [2]8H
While this was a very simple route, I don’t know that it was practical. Namely because it’s kind of bad if your opponent blocks the whole thing unless they’re cornered.
As such, I’ve decided to recommend 2 new routes.
The focus here is to demonstrate how versatile Close Slash is as an offensive tool. Plus, these routes are safer to perform in the event that your opponent blocks the whole thing.
I’ll cover exactly what I mean by “safer” in a second, so let’s look at the first combo:
c.S > 2D > [4]6S
Combo Recipe: 303540
First off, we have to talk about Close Slash because it’s one of the most important tools as May.
Guilty Gear Strive is a game where almost every character’s offense is built around using Close Slash. It can be cancelled into several moves (f.S, 5H, 2D, 5D, 6P, 6H, 2H), which gives you a lot of flexibility for performing combos. It’s also plus on block, which is part of why it’s such an overcentralized part of May’s basic offense.
Attention: What Does Plus on Block mean?
Plus on Block refers to a situation where you are able to act before your opponent after they block your attack. This is very powerful for maintaining offensive pressure as it’ll allow you to continue attacking while your opponent is stuck blocking.
For example, instead of finishing the above combo, you could try to use another c.S while your opponent is forced to block. Alternatively, you could try to throw them if you think they’ll just continue to block. This is only possible because c.S leaves you in an advantaged state whenever it’s blocked.
Very few attacks in Strive carry this property, and many of them are slow.
Close Slash is unique in that it is both fast, and Plus on Block making it very powerful.
Either way, this combo is fairly simple, and will help you to develop muscle memory for buffering a charge while you’re pressing the other buttons in a combo.
This combo also works irrespective of if the opponent is blocking. That’s what I meant earlier when I said that this combo is safer to use. Up Dolphin ([2]8H) would whiff (miss) on opponents who were blocking if you followed my older recommendation. This new combo doesn’t have that problem. As such, you can safely disengage after using Mr. Dolphin if your opponent blocks the whole combo.
Remember: not all combos are safe when blocked. It’s important to learn these safer combos so that you’re not gambling every time you decide to attack your opponent.
c.S > 5H > [4]6S
Combo Recipe: 303542
This is the other combo string that I’d like you to practice. It does a moderate amount of damage when it hits, and, similar to the previously mentioned combo, will leave you safe if your opponent blocks the whole thing.
High/Low Mixups
Once you’ve got your basic c.S combos down, it’s time to learn some high/low Mixups.
To do this, we’ll make use of May’s fastest low (2K), and her overhead (6K).
6K > 2K > 2D > [4]6S
2K > 2D > [2]8S
Combo Recipes: 303543 & 99282
Both of the listed combos are short, but will give you a good starting point for mixing your opponent up. The combo that begins with 2K will hit if your opponent is stand blocking, and the 6K combo will hit if they’re crouch blocking.
As with before, both of these combos should allow you to safely disengage if your opponent blocks the whole sequence.
Some additional things to keep in mind:
If you’re dashing before you use 6K then the momentum from the dash will carry through to the combo. This means that you can actually go for [2]8S after using 2D instead of [4]6S. This is useful because it’ll place your opponent in a knockdown, which will provide you with an opportunity to approach and continue attacking them with once they return to a standing position.
You can also use [2]8H at the end of the low combo. This is preferred when you have your opponent cornered as it will allow you to perform longer combos. However, I prefer using the faster Slash variant of Mr. Dolphin (vertical) while I’m midscreen because of Faultless Defense (FD).
Attention: What is Faultless Defense?
Faultless Defence is a mechanic in Guilty Gear Strive that protects the user from chip damage (damage you take while blocking attacks), and adds additional pushback to attacks.
You perform it by pressing 2 buttons (except for Dust) at the same time while holding block.
In my above example, if your opponent uses FD on 2K > 2D then the Slash version of Up Dolphin will still make contact – it’ll hit them on the way down, instead of the way up. The Heavy Slash version will whiff (miss), which leaves you extremely vulnerable to a counter attack.
Ergo, I prefer [2]8S because it’s marginally safer to use if my opponent decides to use Faultless Defense.
Midscreen Pokes
Fighting in midrange with May is weird. She has several amazing attacks that work great for poking the opponent from afar. However, she can’t really convert any of her pokes into full combos without spending Tension or Burst. As such, everything here is short, and sweet.
5K | 2S | f.S > [4]6S
Combo Recipes: 99289 & 99290 & 99291
These 3 combos may look the same, but they fulfill different purposes.
5K is the fastest of the 3, and will allow you to challenge your opponent while you’re both at midrange. You’re basically looking to use 5K anytime you want to steal initiative away from your opponent by attacking first.
Be careful though because 5K isn’t disjointed, so it isn’t as safe to use as 2S, or f.S
Attention: What does Disjointed mean?
Disjointed refers to any attack that contains a sweet spot where you can’t be hit, but you can still hit your opponent.
The reason for this is that the hitbox of the attack extends beyond the attack’s hurtbox.
Disjointed hitboxes look as follows:

While attacks without a disjointed hitbox look like this:

Notice how in the second example, May’s 5K, the red part (the hitbox) is completely covered by the green part (May’s hurtbox). Whereas in the first example, there is a portion of the hitbox that is completely separated from May’s hurtbox. That separated area is the disjointed hitbox.
2S used to be one of the best attacks in the entire game. In Season 4, it was nerfed slightly to make it less of a catch-all tool for poking your opponents at midrange.
Still, 2S will work as a reliable way to prevent your opponent from approaching you, or as a way to punish your opponent for whiffing (missing) an attack while at midrange.
f.S is the slowest of the three buttons mentioned, but it hits at around a 45 degree angle. This gives it a unique distinction as being the only of May’s poking options which can reliably hit an airborne opponent. As such, I’d recommend using it if your opponent keeps trying to jump at you.
Dolphin Counter Hits
It won’t take very long playing May for anyone to see the following situation happen:
You’re performing an attack string, and decide to end it in either of your Mr. Dolphin (horizontal) special attacks. Your opponent erroneously presses a button, and they’re Counter Hit for their trouble.
Attention: What does Counter Hit mean?
In the simplest terms, Counter Hit refers to when you hit your opponent out of their attack. Because you can cancel normal attacks into special attacks, there is usually a small gap between them. If your opponent tries to attack during that gap, they’ll get Counter Hit out of their attack, which opens them up for a full combo.
Plus, Guilty Gear Strive makes it easier to capitalize on these moments because the game will slow down, and shout “COUNTER” whenever you’ve successfully performed a Counter Hit.
Scoring a Counter Hit leads to additional follow-up options that you aren’t normally afforded. As such, we’re going to capitalize on them with the following options:
[4]6S (ch) 2K > 2D
[4]6H (ch) c.S > 2H > [2]8H
Combo Recipes: 333179 & 333180
As of Season 5, May no longer gets a stagger on S Dolphin, so she’s fairly limited in terms of what she can actually do after scoring a Counter Hit here. Luckily, you can get a hard knockdown, though the timing to link into your low kicks is very tight. You’ll want to practice this one regularly so that you can reliably capitalize on it.
As for H Dolphin, May still earns a stagger here so there are a ton of potential follow-ups. In an older iteration of this guide, I recommended running up and throwing your opponent, which is still a simple and effective option.
However, you can also score a c.S after the stagger, which gives you a much better follow-up than a simple throw. As you can see from the attached video (video coming soon, I promise) my suggested combo will send your opponent flying, and will also let you use Beach Ball to lock them down once they get back up. This will give you time to run in, and continue attacking your opponent.
Anti-Airs
The next thing I wanted to touch on is Anti-Air combos, which I didn’t cover in the previous iteration of this guide.
Basically, Anti-Airing refers to when you spike someone out of the air after they tried to hit you with a jump attack. May has access to 2 different amazing Anti-Air tools, both of which have follow-up options for comboing.
For starters, let’s look at Up Dolphin.
[2]8H > 6H > [4]6S
Combo Recipe: 303565
This move is insanely good at knocking people out of the sky. There are very few aerial attacks that can contest this, and it’ll always let May perform a hefty 6H as a follow-up.
Note, sometimes you’ll want to use the S version of this move since it’s a lot faster. You can’t always go for a full combo afterwards, but you should always be able to hit the opponent with 6H even if it’s OTG.
Attention: what is OTG?
OTG stands for Off The Ground and refers to situations where you can hit the opponent while they’re knocked down. These situations aren’t super common, but some attacks let you perform an OTG for additional damage. 6H is one such attack, so you can use it to score a little bit of additional chip damage against your foe after you knock them on their butt after using Up Dolphin.
Your other option for Anti-Airing is to make use of May’s fantastic 2H.
2H > [2]8H > ad > j.D
Combo Recipe: 303566
While it’s a little more committal, owing to the much longer active time, 2H is the higher damage option for knocking opponents out of the sky. This makes it an especially good call-out against opponents who’re jumping too much.
Also, you’re going to want to make use of the dash macro to perform the airdash after Up Dolphin. If you try to airdash without the dash macro, you might end up landing before the dash comes out, which will bungle the combo.
Jump-Ins
May has some of the best air attacks in the game. So here are a few combos to capitalize off of them.
j.S > 2K > 2D
j.H > 2K > 2D
j2H > 2K > 2D
Combo Recipes: 303548 & 303549 & 303551
These are all fairly straightforward, so I don’t have much to say about them. You score an aerial hit into a knockdown, which gives you another opportunity to mix the opponent up.
Consider also using these air normals as a means to throw your opponent. Air normals, especially heavier ones like j.S and j.H, are almost always Plus on Block. This will give you an opportunity to mix up your opponent by occasionally going for a throw (much like you can after a Close Slash) instead of simply continuing to attack.
Before we close out, I also want to show you what to do if you score a Counter Hit with j.H. This is one of May’s best air normals because it’s very big, and forces the opponent to block for longer than most other air normals in the game. Coincidentally, it also leads into some of her strongest combos, especially on a Counter Hit.
j.H (ch) c.S > 5H > [4]6S
Combo Recipe: 303562
Here’s a simple route to get started with, which can be extended using a Roman Cancel after Mr. Dolphin.
Abare (Mash) Combo
I know mashing is considered a dirty word in the Fighting Game Community, but there are times where it makes sense to mash on defense, especially in Strive.
For example, there is 5 frames of throw protection after you block any attack. That means that if your opponent is trying to throw you, then there’s a window of opportunity where you can mash an attack to stuff the throw.
And it just so happens that May’s 5P, and 2P are both fast enough to score a hit in that tiny 5 frame window.
As such, here’s a simple route to capitalize on that situation:
5P | 2P (ch) 2K > 2D
Combo Recipes: 303563 & 303564
There’s no way you’ll reasonably react to scoring a Counter Hit off a punch button. You’re basically going to be pressing these 3 buttons in sequence, and praying whenever you decide to mash.
However, if you’ve made the decision to mash then you should at least do so into a knockdown. This will give you an opportunity to turn the tables on your opponent, or escape the corner (by jumping over your opponent) while they’re getting up from the knockdown.
Corner Combos
Now that we’ve covered the basics (ie. the stuff that’s going to come up throughout your matches), let’s cover the fun stuff: big damage combos.
Just about every character in Guilty Gear Strive does absurd damage when they’ve cornered an opponent. May is no exception.
As such, here are a few routes to get you started with:
c.S > 2H > [4]6H > 2H > [4]6H WS ender
2K > 2D > [2]8H > 5H > [4]6H > 2H|5H WS ender
6K > 2K > 2D > [2]8H > 5H > [4]6H > 5H WS ender
5H (ch) 5H > [4]6H > 5H > [4]6H WS > ender
Combo Recipes: 303557 & 303558 & 303559 & 303560
There are 2 things that I want to call attention to here: similar to an earlier section of this guide, you’ll need the momentum from a dash to combo properly off 6K. That’s simply a matter of tapping the dash macro, and continuing to hold forward which you’ll already be doing to perform 6K.
Additionally, you’ll want to hold down-back (1) while you’re charging for the bulk of these combos. You can see me doing so while I’m performing most of the combos in the attached videos. Both 4 and 1 work as charging positions for Mr. Dolphin Horizontal, but a down-back (1) charge is a lot more consistent for performing the combo.
The only combo where I outright don’t use a down-back (1) charge is the counter-hit 5H combo, which (I think) is fairly straight-forward. You just need to mash your heavy slash button while remembering to charge and release your dolphin every other hit.
Otherwise, these are fairly straight forward routes, and they give you a choice of 4 different options for what you can do after your opponent wall splats. This is why I’ve marked all 4 combos with “ender” at the end.
Here’s a quick breakdown of what those 4 options are, and when you’d use each of them:
2H: your highest damage, uncharged normal attack. Use it when you need something quick.
6[H]: your highest damage charged normal attack. Default to it unless you know you don’t have time for a full charge. Unfortunately, you’ll have to develop a feeling for when you do, and don’t have enough time to let a fully charged 6H rip. It takes a little over half a second to obtain a fully charged 6H.
236236S: the slower of your 2 supers. It takes a smidge longer to hit than a fully charged 6H, but greatly out-damages your alternative super. The only times where I’m ever able to get Yamada to actually hit the opponent are times when I correctly predict a wall splat. As such, Yamada might be off limits until you have a really good sense for when the wall is about to break.
632146H: Orca is the faster of your 2 supers. Use it whenever you have 50 Tension available. It’ll out-damage all of your normal attacks, and puts the opponent in a hard knockdown after the wallbreak. This will give you an opportunity to take initiative, and continue beating your opponent down while you have Positive Bonus.
Attention: What is Positive Bonus?
Positive Bonus is a buff that you receive whenever you send someone through the wall in Guilty Gear Strive. It increases the speed that you gain Tension, restores a portion of your Burst gauge, and gives you a temporary attack and defense buff.
May already does fairly explosive damage, so having Positive Bonus can help to secure rounds definitively.
Again, I feel obligated to remind any readers that these aren’t damage optimal combos, nor is that goal with my guide. This is just a primer for getting started. You can find a million and 1 resources around the internet for the damage optimal stuff once you’re ready to tackle it. These are simply easy routes that’ll allow you to capitalize on your openings.
Roman Cancel Combos
I’ve referenced Roman Cancels a couple times in this guide, but what are they? This is when you spend 50 Tension to cancel the recovery of an attack, and slow down time. When used within a combo this will manifest as a Red Roman Cancel (RRC), which allows you to extend a combo.
Here are a few examples to illustrate what I mean:
There’s no real rule when it comes to using Roman Cancels – they simply allow you to extend a combo from attacks that don’t naturally combo into anything like May’s 3K.
For the remainder of this section I’ll be using the term hit confirm in all of the combo notation. What this means is that it isn’t super important what you hit your opponent with – all that matters is that you hit them. If you do that, then you can continue the combo with a Roman Cancel, which is what this section is all about!
Hit Confirm > RRC > c.S > 2H > [2]8H
Combo Recipe: 99300
A fairly basic extension from midscreen, which results in a knockdown.
If you’d like to use Beachball (214P) like I did in the accompanying video, make sure you delay it after you land from Up Dolphin. I usually do this visually by sprinting forward, and inputting the special after my opponent has landed on the ground. This should help to things up so that Beachball collides with your opponent once they’ve risen, and become actionable again.
Hit Confirm > RRC > c.S > 2H > [4]6H > 5H > [4]6H WS > 6[H]
Hit Confirm > RRC > 6[H] > [4]6H > 5H > [4]6H WS > 2H
Combo Recipes: 303561 & 249313
If you are anywhere near the corner, however, then you should transition your RRC into the corner combo. This will turn any stray hit from May into an absolutely devastating amount of damage.
It’s worth noting that you should only go for that second combo if your opponent has spent their psych burst. Otherwise, you’re basically asking your opponent to spend their burst while you spend over half a second charging up 6H. However, a fully charged 6H does a LOT more damage than any of May’s other attacks, so it’s absolutely worth using when your opponent has spent their get-out-of-jail-free card.
You can also get a fully charged Dolphin behind your 6H thanks to the Roman Cancel slowdown. In the attached video you’ll notice that I’m simply holding down my Heavy Slash button to charge 6H, which allowed me to begin holding a charge for Mr. Dolphin.
It’s a little awkward to do this at first, but once you get it down, you’ll open your opponent up to taking so much more damage off any stray hit while you have 50 Tension.
Charged Dust
In Strive, there is a universal overhead in the dust normal. This can be helpful for scoring high/low mixups against the opponent, but every single dust normal also has a charged variant. This is what’s known as a charged dust, and landing will open your opponent up for a LOT of damage.
5[D] > [8] > j.H > j.D > j.K > j.H > j.D > j.KK | j.PP
Combo Recipes: 99298 & 99299
The idea here is that you want to press, and hold your dust input. When it hits there will be a bit of slowdown, where players can choose to hold up. When you do this, both characters will be launched into the sky, and you can perform the follow up combo.
The version of this combo that ends in 2 uses of jump kick is the more powerful version, and is what you should default to. The only time you’ll have to use the one that ends in jump punch is against Chipp, Jack-O’, and Happy Chaos. I’m not exactly sure why, but the final jump kick will miss against these 3 characters, so you have to use jump punch instead to finish the combo.
This was actually one of the first combos I learned on May. I know it may look intimidating because it is so long, but it is dead simple with a bit of practice.
Tick Throws
This section doesn’t cover combos, but it does cover something I mentioned earlier in the guide: strike/throw mixups. Throwing your opponent is a big part of playing May successfully. Throwing beats blocking, and forces your opponent to choose riskier options on defence.
c.S | 5P | 2P | 2K > 6D | 623K
Combo Recipes: 99309 & 99305 & 99311& 99306
To that end, here are a list of normals that setup a tick throw. This is when you use an attack that is either Plus on Block, or only a little Minus on Block before throwing you opponent. This helps to make your throw more ambiguous as you could just keep attacking in these situations.
It’s also worth noting that you can tick throw your opponent after they block an Up Dolphin. This would look as follows:
[2]8H > j.P | j.K > 6D
[2]8H > 623K
Combo Recipes: 99312 & 99313 & 99314
Split & Step Off
In Season 3, May received some new cancel options from her Mr. Dolphin special moves called Split (press K while using Mr. Dolphin), and Step Off (press P while using Mr. Dolphin).
The former allows May to jump off the Dolphin, while carrying some of her forward momentum. You can alter said momentum by holding forward or back, which will cause May to either fly at the opponent, or hold her current position.
The latter causes May to step off of the Dolphin early, returning her to an actionable state.
In either case, neither of these new additions provide very beginner friendly combo routing. At least, that’s my opinion.
However, both moves provide options for you to alter how you approach your opponent.
For example, you can hold back while using Split (4K during Mr. Dolphin) to fake your opponent out with Mr. Dolphin, and punish them if they whiff a button trying to hit Mr. Dolphin.
Alternatively, you can use Step Off (5P during Mr. Dolphin) to reduce the total active time of Mr. Dolphin. The main benefit here is leaving yourself at a distance where you can easily whiff punish your opponent if they try to use an attack to beat Mr. Dolphin.
That’d all look as follows:
Combo Recipe: 151389
I’ll be fully honest here – using Spit into a throw, or the j.K route (which I’ve included a Combo Recipe for) are the only 2 ways I use Split (outside of a fake-out to whiff punish the opponent). You can probably get away with using it just as sparingly as I do, but I’ve seen some absolutely nutty mixups from May players who’re more invested in using Split than I am.
Also, I have no idea how to get the training dummy to whiff random buttons, but just pretend that Ky is using 6P in all of those examples where I’m using Step Off in the attached video. Ideally, 2S would score a Counter Hit and then you’d have your choice of a Wild Assault, or Roman Cancel follow-up afterwards.
Either way, don’t be afraid to get a little creative with either of these options as a way to bluff Mr. Dolphin.
Combo Reference
| Combo | Recipe No. |
|---|---|
| c.S > 2D > [4]6S | 303540 |
| c.S > 5H > [4]6S | 303542 |
| 6K > 2K > 2D > [4]6S | 303543 |
| 2K > 2D > [2]8S | 99282 |
| 5K > [4]6S | 99289 |
| 2S > [4]6S | 99290 |
| f.S > [4]6S | 99291 |
| [4]6S (ch) 2K > 2D | 333179 |
| [4]6H (ch) c.S > 2H > [2]8H | 333180 |
| [2]8H > 6H > [4]6S | 303565 |
| 2H > [2]8H > ad > jD | 303566 |
| j.S > 2K > 2D | 303548 |
| j.H > 2K > 2D | 303549 |
| j2H > 2K > 2D | 303551 |
| j.H (ch) c.S > 5H > [4]6S | 303562 |
| 5P (ch) 2K > 2D | 303563 |
| 2P (ch) 2K > 2D | 303564 |
| c.S > 2H > [4]6H > 2H > [4]6H WS 2H | 303557 |
| 2K > 2D > [2]8H > 5H > [4]6H > 5H WS 2H | 303558 |
| 6K > 2K > 2D > [2]8H > 5H > [4]6H WS 2H | 303559 |
| 5H (ch) 5H > [4]6H > 5H > [4]6H WS 2H | 303560 |
| Hit Confirm > RRC > c.S > 2H > [2]8H | 99300 |
| Hit Confrim > RRC > c.S > 2H > [4]6H > 5H > [4]6H WS 6[H] | 303561 |
| Hit Confrim > RRC > 6[H] > [4]6H > 5H > [4]6H WS 6[H] | 249313 |
| 5[D] > [8] > j.H > j.D > j.K > j.H > j.D > j.KK | 99298 |
| 5[D] > [8] > j.H > j.D > j.K > j.H > j.D > j.PP | 99299 |
| c.S > 6D | 99305 |
| c.S > 623K | 99306 |
| 5P > 6D | 99309 |
| 2K > 6D | 99311 |
| [2]8H > j.P > 6D | 99312 |
| [2]8H > j.K > 6D | 99313 |
| [2]8H > 623K | 99314 |
| [4]6S~K j.K > 2K > 2D | 151389 |
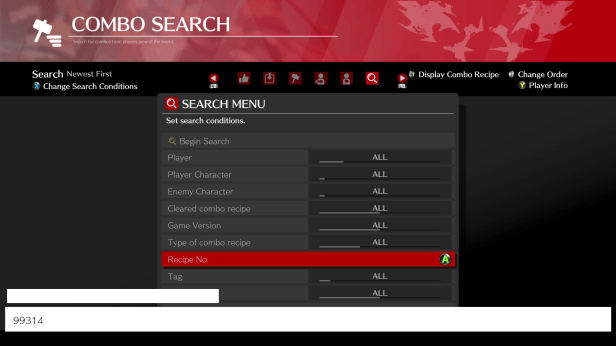
To load a given and practice the associated combo do the following:
- Select Dojo from the Main Menu
- Select Combo Search from the submenu under Dojo
- Under Combo Search, input the provided Recipe number under Recipe No
- Select Begin Search
This should bring up any of the different Combo Recipes that I’ve made, and included in this guide.


Additional References
The scope of this guide was to cover beginner information. As such, I wanted to include a list of resources that you can go to once you’re ready to move to the next step.
Also, if you wanted to see all of the videos in this guide back-to-back, here is a playlist from my Youtube channel with the whole lot of them. It’s publicly available, so you should be able to use it to quickly look up videos for reference.
Full Youtube Playlist of Video Guides from this Guide
Legacy Content
I’ve updated this guide several times since I originally wrote it. The most recent of those revisions was fairly large, and I scrapped a bunch of content from the guide that I thought went beyond the scope of beginner friendly combos. There were also some combos that weren’t particularly useful (for one reason or another), so I scrapped those too.
If, however, you were in the middle of learning those combos, or are interested in checking out some of the legacy content from this guide then you can find a playlist with all of the old videos here.
Acknowledgements & Thanks
Thank you for reading my beginner combo guide for May. I hope you learned something new, and were able to apply it in game. As I said, this guide is meant for very new players which somewhat limits its scope, but I hope that it gets some new players interested in the game. Maybe I’ll run into you out there?
If you have any questions, please feel free to ask them below. I’ll answer them to the best of my abilities.
I’d also like to thank the folks who continue to maintain updating the Dustloop Wiki. I’m grateful that y’all continue to host my Guide as a community resource for new players to learn from. Plus, without all of the time that you folks put into maintaining the Wiki, we wouldn’t have great information available outside of Strive to reference while talking about the game.
Did you enjoy what you read? Consider supporting my work by buying me a coffee over on Ko-fi.

I’ve come back to Strive after a long hiatus and decided to try and learn May. This is by far the best beginner guide I’ve found both for May and for any Strive character. Thank you!
LikeLiked by 1 person
Thank you so much. It means a lot to me to hear that you’ve found this helpful. 🙂
LikeLike